Internet service providers usually set up your network settings and DNS server addresses whenever you sign up for one of their internet packages, either for business or at-home use. This ensures that you never face problems trying to access websites and services on the internet.
Proper DNS settings also ensure that you’re able to download files and work from your office or home.
Now, the problem here is that oftentimes, you’ll find that the DNS servers used by your internet service provider are not only unreliable and slow, they also don’t do a good job of protecting your privacy.
Using DNS addresses from these companies can help enhance your internet browsing experience.
In this guide, we’ll take a look at the steps you need to take to change the DNS server on your Windows 10 computer.

Table of Contents
What Does DNS Mean?
DNS stands for Domain Name System. Its job is to allow users to input a user-friendly website address or domain name into the URL bar of their web browser to access a given website or online service.
If there was no DNS service, it would be very difficult to access even the most basic of internet services.
The other thing you should understand is that any device that has an internet connection must have an IP address.
Most of the time, it would be something like 506.457.14.512. Without this IP address, the device has no way to communicate with any other device on the network.
As you can probably imagine, remembering IP addresses might be a hard task even for people with a good memory.
Behind every domain name, there is an IP address that the computer has an easier time understanding.
As such, when you enter www.google.com to access the Google search engine, what really happens in the background is that your web browser takes that domain name and then sends a DNS request to a DNS server. The DNS server then resolves the domain name into its corresponding IP address.
Once the DNS server has found the address, it sends that information back from where it came, and then your web browser can connect to Google (or any other website).

The reason why you’ve never noticed this process so far is that it happens very quickly in the background of your everyday online activities.
But if your DNS resolver is slow, your browsing experience will also be slow. This is also why Windows 10 allows users to change DNS settings and use any DNS service they like.
In the following sections, we’ll describe two methods you can follow to change your DNS settings.
Step-By-Step Guide: How to Change DNS Server on Windows 10
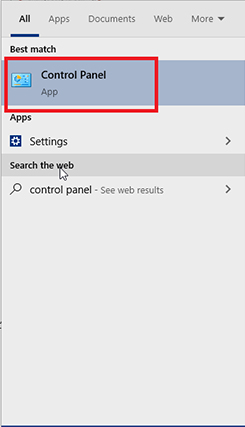
- Go to the Control Panel. You can do that by clicking the small Windows icon in the bottom left corner of your screen and typing Control Panel.

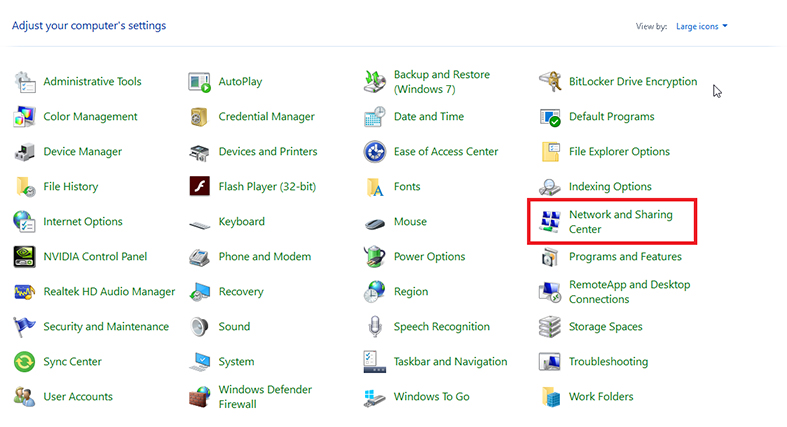
- Go to Network and Internet.
- Click Network and Sharing Center.

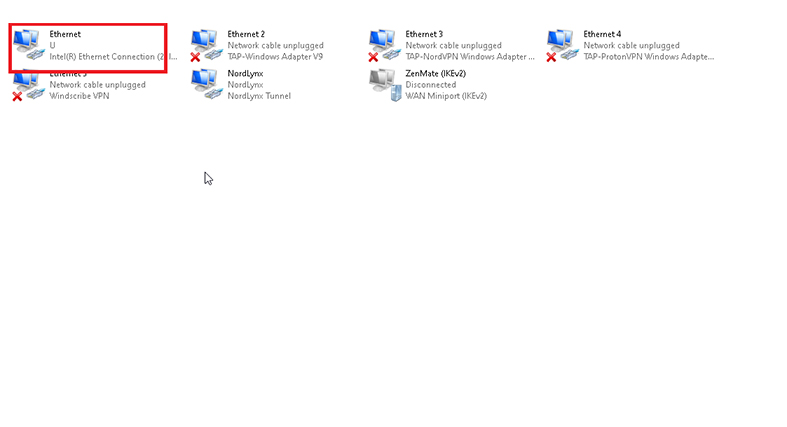
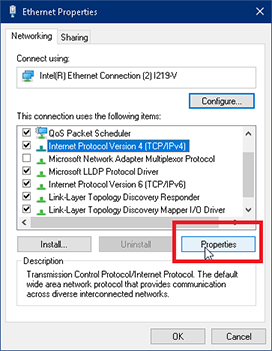
- Open Change Adapter Settings at the pane on the left.
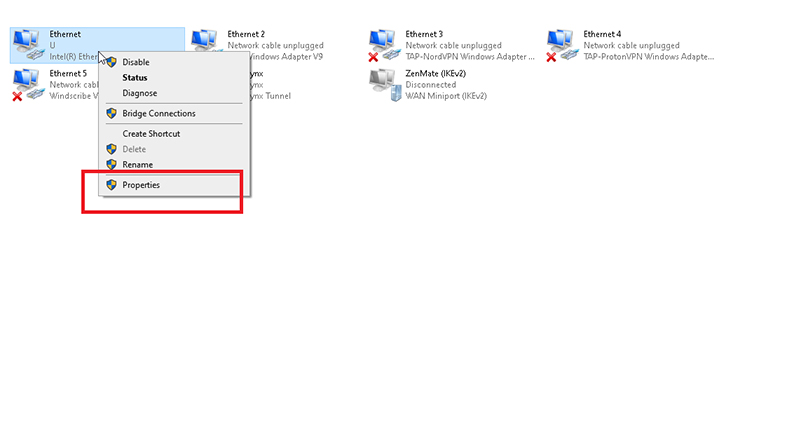
- Right-click on the active/relevant Ethernet icon and then click on Properties. Look at the color to know which adapter to click on. Any adapter that isn’t active would have “Disabled” written beside or below or it would have the label “Network Cable Unplugged.”
- In this step, you should check the option Internet Protocol Version 4 (TCP/IPv4).
- Hit Properties.

- Click on the option Use the following DNS server addresses.

- Input your alternative and preferred DNS addresses.

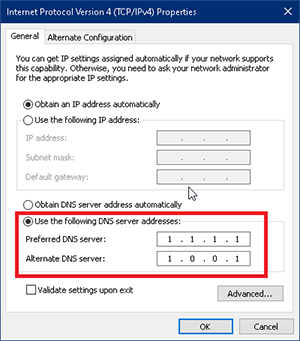
Now, you have a couple of options here with OpenDNS, Google Public DNS or Cloudflare:
- For OpenDNS, use 208.67.220.220 and 208.67.222.222
- For Google Public DNS, use 8.8.4.4 and 8.8.8.8
- For Cloudflare, use 1.0.0.1 and 1.1.1.1
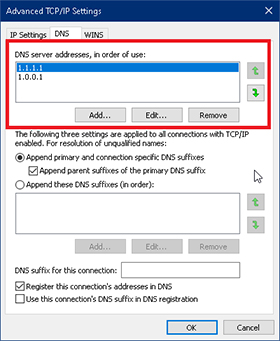
You can also click the button labeled Advanced for more settings. Then click on the tab labeled DNS and then on the button that says Add.
From there, input the DNS server address you want to use as your alternative. Then click the button that says Add and then hit OK. After that, click Close.
Pro Tip:
From the Advanced tab, you also have the option of removing and editing more DNS resolvers and specifying the priority of each.Once you’ve followed all the steps mentioned above, your internet-enabled device will use the new DNS settings.
Method #2: How to Change DNS Server on Windows 10 via Settings
This method of changing your DNS settings will use the Settings app in Windows 10. These steps might be easier for users who are new to the Windows experience.
If you’re comfortable with Windows 10, then the Control Panel method described above would probably feel most at home for you.
Use the following steps to change your DNS settings:
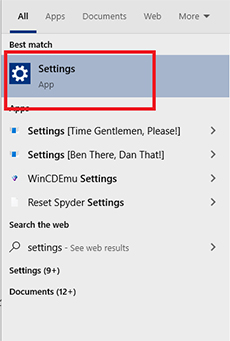
- Click on the Windows logo icon in the bottom left corner of your screen and type Settings. Left-click on Settings.

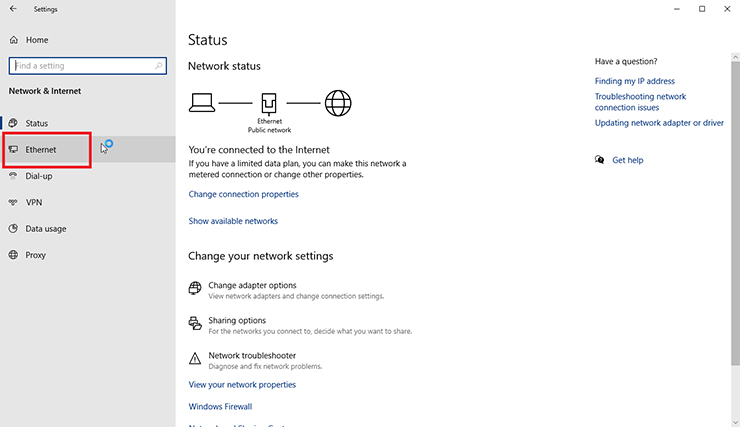
- Then go to Network and Internet.

- Then go to Ethernet.
- Click on the internet connection that’s currently providing internet service to your Windows 10 computer.
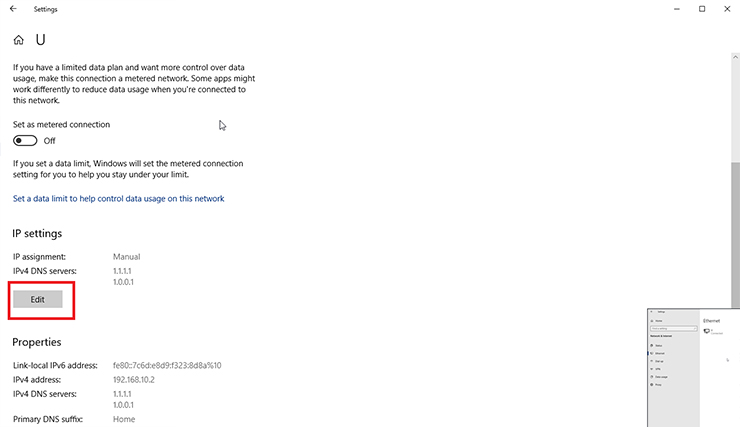
- Now take a look at the section under IP Settings. Click the button that says Edit.
- You should see a drop-down menu. From there, access Edit IP Settings and then click the option that says Manual.
- Enable the switch labeled IPv4.

Now enter your Preferred DNS and then your Alternative DNS. As we outlined above, you should enter the option for the DNS service you want to use:
- For OpenDNS, use 208.67.220.220 and 208.67.222.222
- For Google Public DNS use 8.8.4.4 and 8.8.8.8
- For Cloudflare, use 1.0.0.1 and 1.1.1.1
Hit Save, and then you’re done. Now you can close the settings window if you want.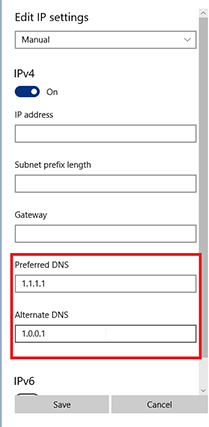
Your Windows 10 computer should now be able to connect to the internet using the new DNS configuration.
Note:
There is also the Command Prompt method of changing DNS servers, but we wouldn’t recommend this to anyone who doesn’t already know how to use Command Prompt.FAQ
Click here to run a DNS leak test on your connection to make sure your privacy is safe.