This is the guide that we have written for people who have grown tired of having to get up from their couch each and every time that they have to play, stop or pause a particular stream or select another stream.
Kodi users:
You need to read this guide.
Wako is the application that we think you will find immensely useful if the problems we have mentioned above are the tones you are tired of as well.
Our research shows that Wako is perhaps the only comprehensive application which allows the user to have complete control over their Kodi device by simply making use of an iPhone device or an Android phone.
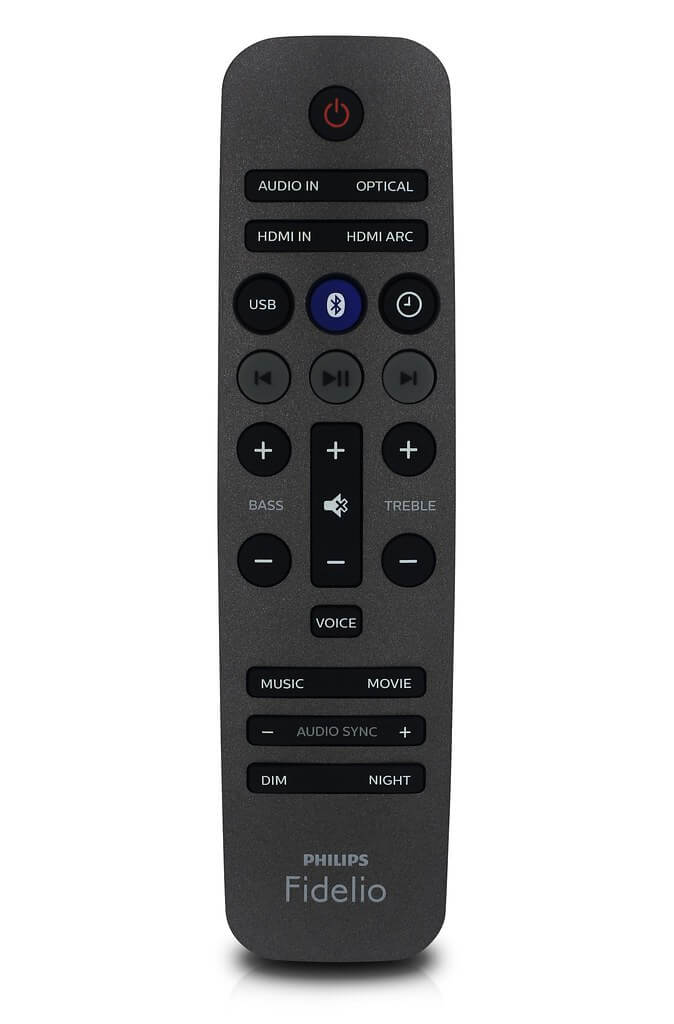
In this guide, we will talk more about what the official Wako app is and how does it work on Kodi and how Kodi users just like you can install it and get a brand new remote control.
With the help of apps such as Wako, you can take your Kodi streaming to a whole another level.
All of your favorite HD content would automatically become more exciting once you figure out how to make use of the official Wako app.
Wako app is the one thing that you need on your Kodi device to upgrade it.
How?
Well, if you ever had a dream where you could make use of your smartphone device to control your Kodi device, then the official Wako app probably represents your dream coming true.
But that is not all.
If you had a desire to view all the content on your device via Kodi without ever having to touch your TV or your computer machine then the official Wako app is what you need right now.
The Wako app is the closest you will ever come at not touching your machine but still consuming content on Kodi.
That is, until we see something even better than Wako.
But the Wako app doesn’t just act as a remote control for your Kodi device.
It does much more.
So much more that we had to write a complete guide on it.
To start things off, we would like to mention again that all you need for the purposes of this guide, is the official Wako app.
Apart from that, you should have an iPhone or Android device as well.
Of course, you will also need a device on which you have installed your Kodi software.
Table of Contents
What is Kodi Wako app>
Wako essentially stands for Watch in Kodi.
As mentioned before as well, it is a Kodi app.
Wako allows users to have access to their Kodi software as well as Kodi content from some other internet-enabled device and then stream it.
Moreover, the official Wako app also provides Kodi users with better navigation options for activities such as browsing one’s Kodi content and controlling commands for properly playing one’s content.
As mentioned before, it would not be a stretch to think of the official Wako app as a remote control for Kodi.
The Wako app also has the ability to send various other kinds of commands to pretty much any and all Kodi add-ons.
We have also come to know that the app has full support for OpenMeta Open Players.
Kodi users have the option of choosing the Kodi content that they want to view by directly using their phone.
The official Wako app also has no trouble in working with Kodi add-ons such as trakt.tv.
Hence, assuming you have installed Kodi on a multiple number of internet-enabled devices, trakt can easily synchronize the user’s settings across all of them.
This apparently also means that if you manage to get trakt and Wako working together, you can have all of your HQ media content showing up with its respective metadata.

We’re talking about metadata information such as posters, album arts and a ton of other stuff.
As mentioned before, using trakt with Kodi and Wako is the ideal combination for Kodi users who want to synchronize their settings and their content progress over all their streaming devices.
Wako app: List of features
Wako app comes with lots of features.
And a lot of those features are useful.
So it’s not like Wako app offers users features just for the sake of it.
That attention to the overall product is the reason why the Wako app is able to make the process of streaming content on a given Kodi device such an easy task.
Let’s list out some of the top Wako features that all Kodi users can benefit from,
- Wako allows users to watch trailers of all of their content and a ton of other stuff
- With Wako, Kodi users can keep track of all the episodes and TV shows that they would want to watch the next time they turn on Kodi
- Wako enables users to have a complete watch list of all the movies and shows that they would want to watch next.
- It provides access to TV Show and Movie information.
- It keeps track of all the shows and movies that the user has watched.
- It enables users to search for their favorite Movies and TV Shows manually.
- Wako is also able to send Kodi users notifications about various upcoming Movies and TV show episodes.
- It allows users to control the content that they are playing on Kodi via remote-like features automatically
Step by step guide on how to install the Wako app and how to set up the Wako app
Now, let’s get to the part where we teach you how to install, configure and set up the Wako app.
This section of the guide will assume that you have an Android smartphone available with you and have also installed Kodi 18.1 on your computer which is running the Windows operating system.
Fortunately for all of us, the steps that we have outlined in this section of the guide will also work with other Kodi devices.
You are free to not use an Android device and instead use an iPhone device.
Before we begin though, make sure that you have taken care of some small but significant details such as enabling the remote control feature in Kodi.
If you do not know how to do that then keep reading.
How to enable the remote control feature in Kodi
- First, you need to run Kodi and make your way to the home screen of Kodi.
Then tap on the button in the shape of a gear. This should take you to the Settings menu. - Then you should click on services.
- When that is done, you should look on the left side of your screen and choose the tab that says Control.
Next, you need to click the toggle button which appears in front of the option that says ‘Allow remote control via HTTP’.
On that note, also make sure that you have set the Port number to 8080. - Now, you need to enable the relevant toggles for two more options.
First, enable the one for Allow remote control from applications on other systems and then enable the toggle for Allow remote control from applications on this Kodi system.
Following these steps will make sure that you have your remote control feature enabled and ready to work.
Now you should proceed forward by installing Wako app either on iOS or Android.
Keep in mind that you should not shut down your streaming Kodi device just yet.
In fact, just make your way back to your home screen as you will need to carry out some steps later in this guide which will require you to visit this menu again.
How to make sure your privacy is secured?
Whenever you put yourself in a position where you have to use Kodi add-ons (especially when you are using third-party unofficial Kodi add-ons) to stream content, you are risking your privacy.
Most of the popular Kodi add-ons scrape content from the internet.
They have their own mechanisms of searching for various streaming sources.
Once such Kodi add-ons have found the streaming sources, they provide Kodi users with the corresponding links which they can use to stream content on their Kodi devices.
Now, while Kodi add-ons are doing their thing, they do not really have a way to distinguish copyright or free sources from legitimate ones.
Because of that, you may get yourself involved in accessing various streams to play your favorite content while violating the law.
Of course, different countries have different laws when it comes to viewing copyrighted material on the internet.
Some have harsher laws while others are more lenient.
You should not take the risk of not knowing what the law is in your region.
We should also mention your internet service provider here.
ISPs are known to hate unofficial Kodi add-ons.
That is why some ISPs actively work to block them.
Sometimes you may be able to access some of them while other times you may not be able to stream from any unofficial Kodi add-ons.
ISPs also have the option of recording your IP address once you have started to stream content from various unofficial Kodi add-ons.
As such, you may get into legal trouble if ISPs decide to share your information with copyright protection groups.
Since ISPs have access to your IP address, they indirectly have access to your online identity as well.
Of course, they have no way of making sure that you are violating copyright laws on your own will.
You may be.
You may be not.
It doesn’t really matter since you would still be viewing copyrighted content.
The point we’re trying to make here is that your privacy is too important to be left to chance.
So do not make the mistake of not using some form of protection while you are streaming content from your Kodi device.
And remember, if you do not protect your privacy, you not only risk legal problems but also risk not being able to use any Kodi add-ons.
As mentioned before, ISPs now do have the ability to block content from various unofficial Kodi add-ons.
Whatever the case may be, the simple fact is that you need to make use of a tool that makes all of these problems go away quickly and painlessly.
And the best tool for that is a VPN.
There are a ton of other reasons why you should always use a VPN but to start things off, if you want your privacy while streaming content on Kodi, then you need to use a VPN service.
If you sign up for any of the best VPN for Kodi that we have mentioned in our guide (click here for the guide) then you will give yourself all the chances in the world to change your IP address.
A good VPN for Kodi will change your IP address to one of its own VPN server’s.
Hence it will protect your online identity more than any other tool that we know of.
Also, keep in mind that a good VPN for Kodi would also encrypt and tunnel all of your traffic.
This would hide all of your activities from your internet service provider.
And once that happens, no one will be able to know what you are doing on the internet.
Isn’t that what you always wanted?
With that said, perhaps this is a good time to mention that not all VPNs are able to work appropriately with Kodi.
Some of the VPNs which are available on the market actually record the things that you access on the internet.
Not only that, they also keep navigation logs on the user via their VPN servers.
They do such heinous stuff so that they are able to sell that user information to publicity agencies online.
Then there are those VPN services that simply do not work with Kodi while claiming that they do.
These VPN services do not have the expertise and the infrastructure to unblock geo-restrictions which are placed on various types of content by different ISPs.
If a VPN service does not have a huge number of servers spread across the globe, then there is a great chance it would not work with most of the unofficial Kodi add-ons that you so desperately want to install.
Moreover, such VPN services cannot provide users with sufficient bandwidth/speeds in order to play HD streams.
These are just some of the reasons why you need to sign up for a good VPN service for Kodi.
We have compiled a list of VPNs for Kodi that have a strict zero-logs policy and offer fast VPN servers for ideal streaming conditions.
Our best VPNs for Kodi also offer unlimited bandwidth connections and offer a huge VPN server network spread all over the map.
With the best VPNs for Kodi listed in our guide (click here to view that guide right here and right now) your online identity will remain hidden from the rest of the world.
No one will ever be able to reveal your true identity and most of all, you will have full opportunity to stream as much content from Kodi add-ons as you like.
And since no one would ever know what you are doing in the online world, your ISP will also not bother you anymore.
Perhaps the greatest benefit of signing up for one of our best VPNs for Kodi is that all of them protect a multiple number of devices per account.
So if you want to save money and purchase protection for all of your household then sign up for one of our recommended best VPNs for Kodi.
Click here to read our best VPN for Kodi guide right now.
How to install Wako app and how to properly configure the Wako app
These are the steps that you need to take in order.
- First, turn on your smartphone device and then go to your device’s official App Store.
If you have an iPhone device then you will go to the App Store and if you have an Android device you will go to the Google Play Store app. - Then you need to search for the app named Wako.
Once you do, you should click on the Install button.
If you are on the iOS platform, then you will need to click the Get button.
After that, you should wait for a while before your device installs the Wako app on your mobile device. - Now, after your device has finished the process of installing the new app, you need to launch the app.
Then you need to sign up with the previously-mentioned trakt app or sign in to trakt if you already have it on your mobile device. - Based on what you will be seeing on your screen at this moment, you should click on Yes in order to allow Wako to connect with your official Trakt account.
- Now, go to the homepage of Wako.
Click Settings.
Then, hit Configure Hosts. - Now, hit the button that says Add.
- Once the previous step is done, Wako should start the process of detecting any and all Kodi hosts.
Any Kodi devices will show up on the screen.
So be patient.
Meanwhile, make sure that both your Kodi and phone have a connection to the internet via the same network. - Once you see your Kodi device, click on it.
Wako will now save it as a host device.
You may press the button that says Skip if for some reason the Wako app does not detect your Kodi device on its own.
If you do so, then you should follow these steps:
- Go to the next screen and choose a name for your Kodi device.
- Add the Kodi device’s Host IP or address.
Go to the settings menu of your Kodi device and check System Information.
From there copy the IP address directly into the Wako app. - You would know that the Wako app has connected to your device once it changes the Connection Status to OK from KO.
Now, simply follow the rest of this guide.
Step by step guide on how to configure the Wako app with Kodi.
In this section, you will learn how to install and then set up OpenMeta Players and OpenMeta itself.
You need to do this in order to have Wako working seamlessly with Kodi.
Once you do so, you will have the option of automatically playing TV shows and Movies on Kodi from the official Wakko app.
Of course, we’re assuming you have the right Kodi add-ons.
- Hit Settings from the home screen of Kodi.
It is the gear-shaped icon in the top left corner of the screen. - Choose File Manager.
- Click Add Source.
Hit <None>.
Type https://a4k-openproject.github.io/
Click the OK button. - Click Enter a name for this media source field.
Type .a4k.
Click OK. - Navigate to Kodi system screen.
- Click Add-ons
- Hit Install from zip file.
- Choose the repo that you added in the previous step. It should have the name .a4k.
- Hit repository.addons4kodi-x.x.zip
- Now, wait till Kodi shows you the Addons4Kodi Repository successfully installed notification.
- Choose Install from Repository.
- Choose Addons4Kodi Repository.
- Click the option Video Add-ons.
- Choose OpenMeta
- Click Install.
- Kodi may inform you that it will install some additional Kodi add-ons.
Hit OK.
Again, wait till it shows you the OpenMeta Addon Installed popup message. - Go back to Addons4Kodi Repo.
Select Program Add-ons. - Hit OpenInfo
- Click Install.
- A new window will pop up.
Hit OK. - Another popup will show up. Click No in order to skip the execute setup-wizard option.
- Wait till Kodi shows another successful installation popup.
- Go to Kodi home menu.
- Hit OpenMeta addon.
- Hit Settings
- Click the General Tab.
Click Players URL.
The value here should behttp://bit.ly/openplayers(No longer working) Change it, if it is something else. - Hit Total Setup now.
- Wait again for another successful installation message.
- Now click Yes to finish everything off.
Congratulations.
You are done.