Before we list the steps you need to take to log in as admin on your router, you should know that while every router and/or modem is different, the process of logging into the admin panel is generally the same. In other words, the steps described below may not exactly match those you’ll need to take with your specific router and/or modem, but they should work for any modern router and/or modem.
Moreover, even though we’ll use the web browser of our choice, you are free to use any mainstream web browser you want, either on the mobile platform or the desktop platform.
Here are the steps you need to take.
Table of Contents
Step 1: Check Your Internet Connection
While this step might seem obvious, you must start the process by checking if you have a working internet connection and a connection to your router. The type of connection doesn’t really matter—you are free to use either wireless or cable connections for the purposes of this guide.
However, we should mention here that if you plan on following this guide by accessing a router that is not in your current network, you will have to enable Remote Administration. And while you are at it, it’s also a good idea to note down the external IP address of the router you want to access. As you can see below, you’ll need to use that external IP address to log in to your router’s admin page using a web browser.
Note:
With that said, keep in mind that working with a router that is not on your current network is fairly difficult in the sense the process rarely goes smoothly. You’ll have to go back and forth checking the manual, changing IP address values and taking other steps to connect to and change your router settings.The other problem is that there is no way to tell if your router’s IP address has changed while you’re using the Remote Administration feature to change the settings. The vast majority of home networks today use dynamic IP addresses, which means they can easily change while you’re in a Remote Administration session. That can seriously disrupt your workflow and reset any changes you may have made.
Step 2: Get Your Router’s Default IP Address To Access the Admin Page
An IP address is not an overly complicated number. If you happen to have a router from the past 20 years or so, the manufacturer would have set the default IP address of your router to something like 192.168.1.100 or 192.168.2.1 or 192.168.1.1 or 192.168.0.1.
If none of the above IP addresses worked for you (since there are many ways to change your IP address) and you don’t know what your router’s default IP address is, you will have to learn how to find your default gateway IP address.
For Windows users, that can be as quick as opening the command prompt and using the ipconfig command. If you are on the macOS platform, you’ll have to use the ‘netstat -nr | grep default’ command in the terminal app to find your default router IP address for accessing the router admin panel. Linux users will also have to open up a terminal and then use the command ‘ip route | grep default’ to see the router IP address.
For mobile users on Android and iOS, you can use lots of methods to find out your router IP address. But since you are restricted both in terms of raw power and tools to know your IP address from within the system, you should use your web browser to go to whatsmyrouterip.com to see both your public and private IP addresses. Of course, you are free to use the website on your laptop or desktop computer to simplify the process without using any command-line program to know the private IP address and public IP address of your WiFi router.
Note:
However, we should warn you that even though the website above offers a quick and straightforward way to find your router IP address, there are better methods of knowing your default gateway.Sometimes whatsmyrouterip.com will show you an incorrect IP address; then, you will have no other option but to go to the Settings menu of your mobile device and then click the WiFi option and then click the Router option to know the default gateway. On Android devices, you can sometimes swipe down and then click on your WiFi, then on Advanced and then Gateway to see the router IP address, but the exact steps will be dependent on your Android phone model and make.
Now, we’ll move to the third step:
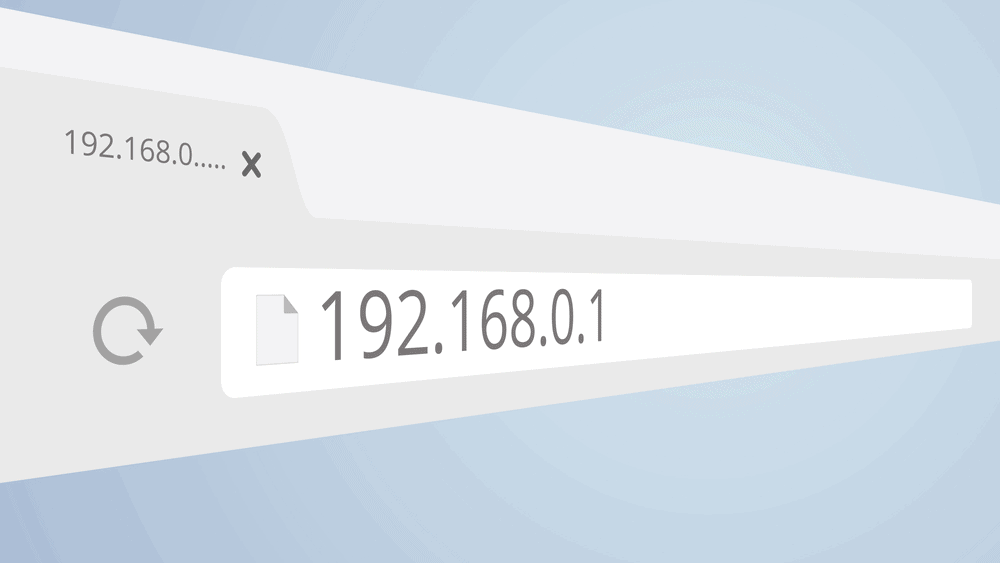
Step 3: Type Your Router IP Address Into Your Browser’s Address Bar
For this step, you’ll need to use a mainstream web browser. You can use Google Chrome, Mozilla Firefox, Internet Explorer, Microsoft Edge, Opera or even Vivaldi. Once you have decided on the web browser you want to use, you’ll need to make a request for a connection with your router by typing the IP URL into your browser’s address bar. The easiest way to do that is to use the router’s IP address that you found out while going through the previous steps.
To take an example, let’s say you found out that the default IP address of your router is 192.168.1.1. What you will do is, launch your web browser and type the URL into the address bar: http://192.168.1.1

That should connect you to your router. Of course, if your router’s default IP address is different (something like 192.168.2.1), you will use that URL in the address bar to access your router’s admin panel.
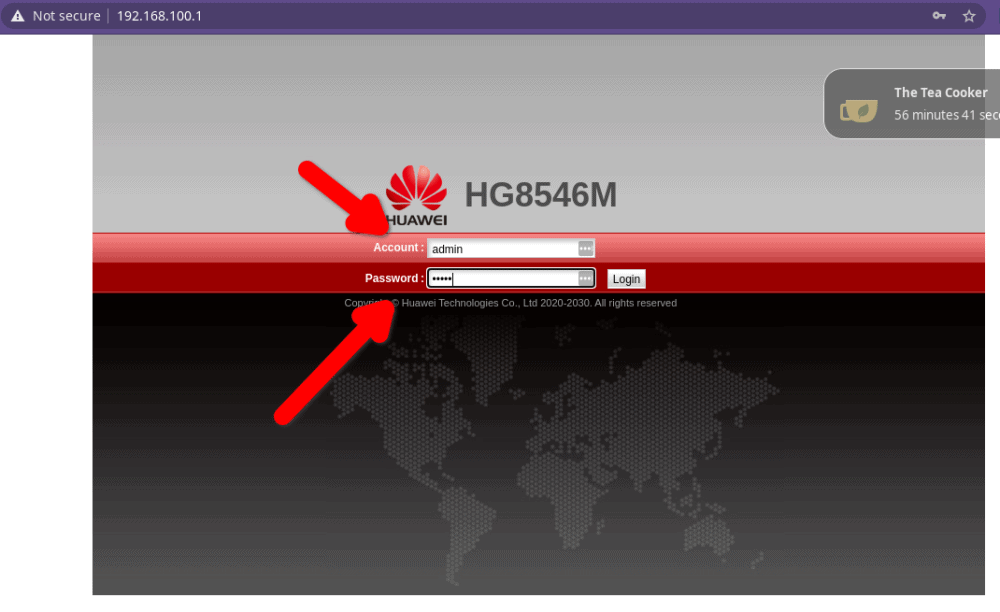
Step 4: Authenticate With the Username/Password
If you followed the steps mentioned above correctly, you should see the main screen of your router console. The screen will probably show you the brand or manufacturer of your router, along with two fields below for your username and password.
This is important:
Accordingly, you’ll need to provide your admin password and username to authenticate your connection. Once you do that, the router should allow you full access to all its settings and features.You may run into problems here, though. You may not know your router’s username and password. Each router has a default username/password login set, but someone could have changed it, or maybe you changed the username/password yourself but forgot about it until now.
If you don’t remember changing the default username/password of your router admin panel, you should try typing the term “admin” (without the quotation marks) into the username and password fields.
Again, depending on the make and model of your specific router, the “admin” term may not work for you. That works both ways, though. Some routers don’t come with any password, and if that is the case with you, then count yourself lucky and set one up while you are in the settings menu.
Additionally, some routers don’t have a username nor a password at all. In that case, the risks of someone compromising your network security far outweigh the benefit of not having to input a username/password combination every time you want to log in to the admin panel and adjust your router’s settings.
One other solution is to go to your router provider’s official website and input the name or number of your router model to find the default username and password. Many router manufacturers upload default username/password information for specific models on their websites.
More specifically, you should note down your router’s manufacturer (popular router manufacturers include NETGEAR, Linksys, D-Link and Cisco), then go to the manufacturer’s official website and search for your router there. If you currently have access to the documentation that came with your router, you can consult that to find the username and password and then log into the admin panel.
Pro Tip:
Do take note that if you are using a rare type of router, such as Google WiFi, you may not need to go through this entire process of finding out the IP address and using a web browser’s address bar to access the admin page. In the case of Google WiFi, you should have access to a mobile app you can use to log in to the admin panel.What To Do if You Still Can’t Access Your Router Even After Using the Right IP Address?
Okay, so you used all the commands we mentioned in the previous sections, read through your router manufacturer’s website and went through the documentation. Yet, you still can’t access the admin page. What should you do if you don’t have the admin password or the username/password combination?
Provided you have a valid network connection that allows you to surf the internet as usual, you shouldn’t expect your router’s admin console to be malfunctioning.
Here are the steps you need to take in case you’re left with nothing but a non-working combination of a username and password.
Step 1: Reboot Your Router
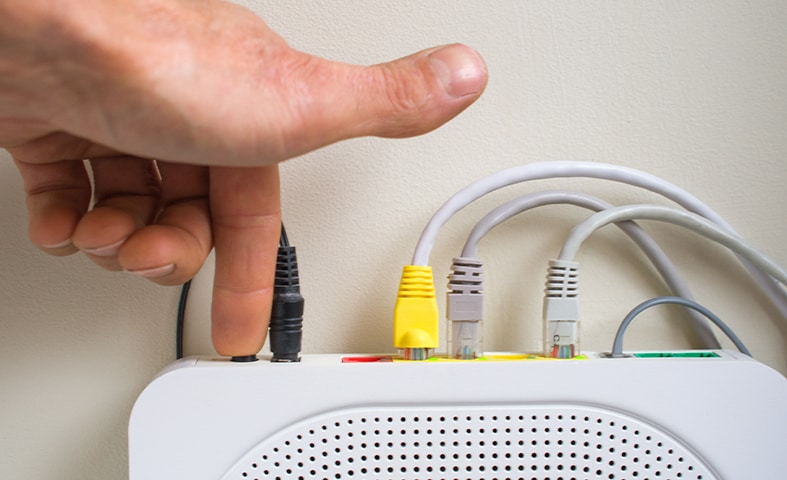
This step can be a bit involved if you have never done it before. We’ll start simply by unplugging the router from the back. If there is a modem in your system, turn that off as well. The same goes for users who may have network switches within their network hardware setup. Unplug everything that has to do with providing you with an internet connection.
We should also mention that by saying “unplug your modem and/or router,” we do mean unplug it.
Don’t use the restart or the reset button that is present at the back of your modem or router. When pressed, these buttons not only turn off the device but also initiate the factory reset procedure. Of course, many modems and routers now come with a dedicated power button, which is usually built a bit differently than the restart and reset button.
In any case, unplugging your router or modem is the best way to make sure you don’t run into problems later on. You will need to wait for 30 seconds or so before your modem, router and all the rest of the devices finally have a chance to indicate to each other and your internet service provider that they are offline.
Now, plug the wire back in. You may need to press the router’s power button if plugging the wire in doesn’t get it online. You will have to wait for another minute or two before your modem is done authenticating your connection with your internet service provider and gets a public IP address.
And that’s it—now, we move on to the next step:
Step 2: Run Your Web Browser

Again, you are free to use any mainstream web browser such as Mozilla Firefox, Google Chrome, Microsoft Internet Explorer or Edge. Use the browser to request a connection by inputting your router’s IP address into your web browser’s address bar.
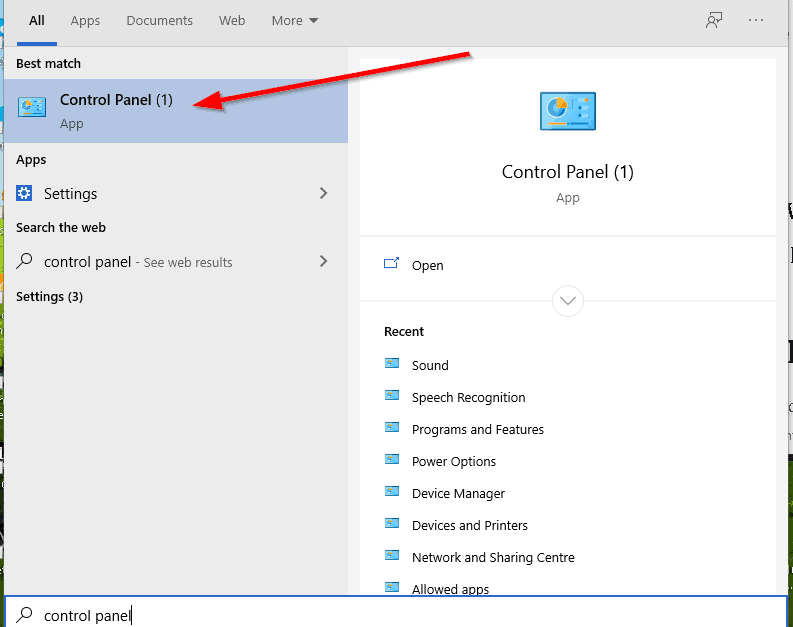
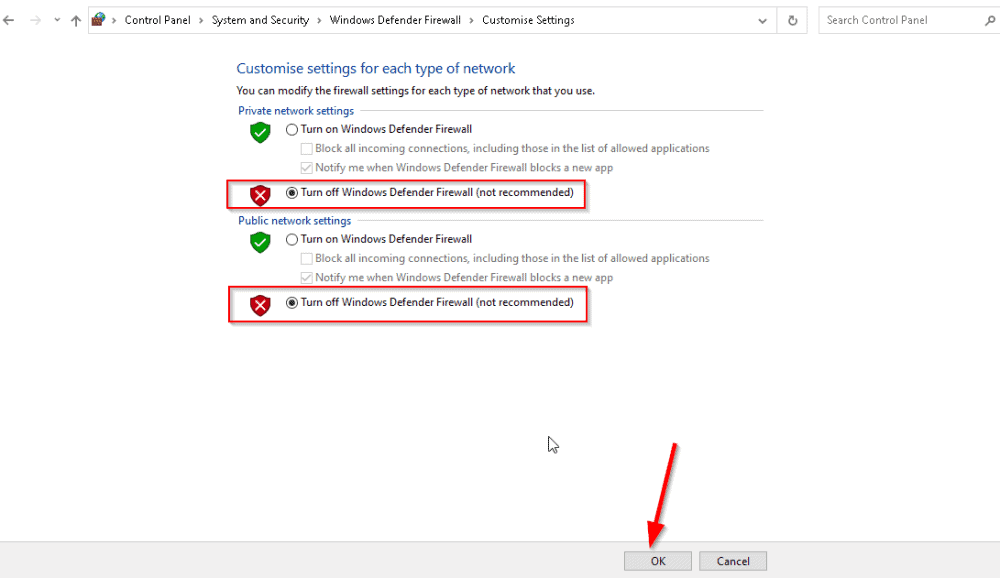
Step 3: Disable Firewall
If you’re using the Windows platform, follow these steps:
- Step 3A: Go to the Control Panel.
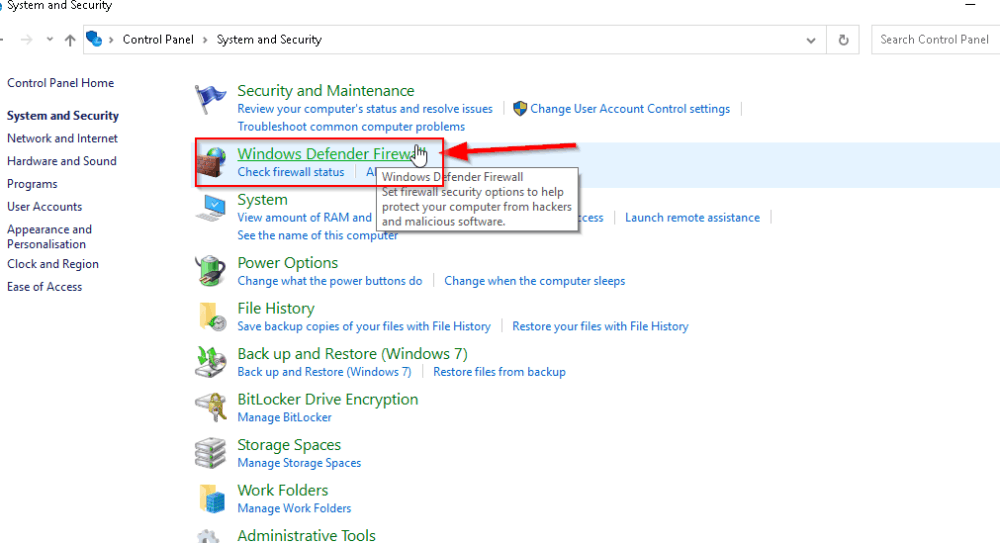
- Step 3B: Go to System and Security.

- Step 3C: Click on Windows Firewall.
- Step 3D: Click on the option that says, Turn Windows Defender Firewall On or OFF.
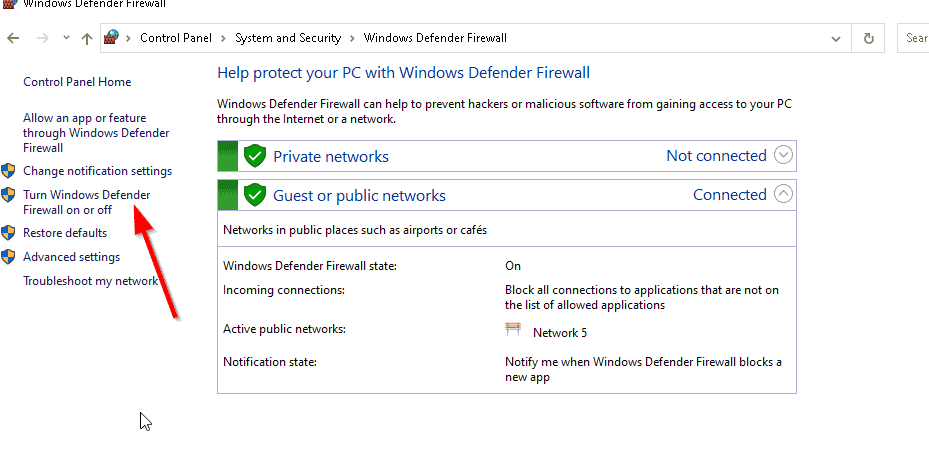
- Step 3E: Choose Turn Off Windows Firewall.

- Step 3F: Click OK.
Step 4: Launch Your Web Browser
Use any that you like and, as always, send a connection request to your router by making use of its IP address. Type it into the browser’s address bar.
Step 5: Reset the Router
Now, it’s time to reset the router instead of just unplugging it and then plugging it again. Once your router is reset back to its factory defaults, it will essentially go back to the condition in which it came to your house or office.
It will have the default IP address, along with the default username and password, for easy login credentials.
Step 6: Launch a Web Browser and Start Configuring
The last step is to simply launch your web browser one more time and use your router’s default IP address to send it a connection request. Then, you’re good to go.
Should You Use WiFi or Ethernet Cable/Wired Connection To Login as Admin?
For reliability and convenience, it is best to use a wired connection the first time you are making changes to your router via the settings menu. You can do this with a standard ethernet cable. A wired ethernet cable connection will not drop while you’re busy changing different wireless or security settings.
If you’re on a wireless WiFi network, any change in the router’s settings can cut you off from the network, and then you will have to spend quite a bit of time to get things back on track.
While you’re doing that, make sure you bring your computer close to your router. That will keep the signal strength and reduce connection drops because of weak WiFi signals or interference.
What To Do if You Don’t Know Your Router’s Admin Password?
As mentioned throughout this guide, pretty much every modern router comes with a default username and password. Router manufacturers know that the owner of the router will need to access the admin settings from time to time and hence account for that possibility. However, sometimes you just don’t have the admin password. In those cases, here is what you need to do.Pick up your router without disconnecting it and look at its backside. See if you can find a button that says WPS. Most of the time, it is a small button (either black or in color) on the extreme left or extreme right side of your screen. It is rarely in the middle.
Once found, you need to make sure that your router is turned ON and then count to five while holding down the WPS button at the back. As you’re holding down the button, you should see the WPS light blinking. Usually, when that happens, it means your router is now prepared for a connection setup.
So, get your phone out and connect to your router via the WiFi options. You can easily identify the router you want to connect to by looking at its name from the list. In most smartphone devices, the moment you tap on a given router for a WiFi connection, the phone asks for a security key. You need to tap on the cancel button when that happens on your phone.
Your phone should show you a More option. Most of the time, this comes in the form of three vertical dots. Tap it and then choose the option that says WPS Push Button.
How Exactly Do I Use 192.168 2.1 and Other IP Addresses?
The numbers 192.168.2.1 or 192.168.1.2 actually belong to your router. If you want to modify your router settings, you will need to access the admin panel’s Settings menu.
To do that, you will have to use the 192.168.2.1 or 192.168.1.2 (if that is your router’s IP address; it could be something else as well) IP address by opening up a web browser and then typing it out in the URL address bar provided. That is how you can connect to your router.
Conclusion: Router Login via Web Browser With Private IP Address
As you can see, it’s easy to log in as an administrator on your router, provided you have enough preparation. You will need to know your router’s IP address, have a web browser like Google Chrome or Internet Explorer, or Microsoft Edge available, and then use the browser’s address bar to access your router’s settings menu by also knowing the right username and password combination.Routers are generally very reliable devices that connect you to the internet and then get out of your way to the extent that you won’t even notice the router is even there. However, sometimes they do malfunction. And that is when you will have to access the admin panel and settings menu to make changes and keep your network in working order.
The basic steps remain the same, no matter what type of router you are using. With the information we have provided you so far, we hope you are more prepared than ever to access the admin page, make changes, and modify your router’s name and password from any computer you want.
If you run into any problems at all, make sure you let us know in the comments below and we’ll get back to you as soon as we can.