
Most online users consider Mozilla Firefox web browser to have more than sufficient amount of privacy-friendly tools right out of the box.
And perhaps Firefox is the only mainstream web browser that takes care of user privacy as much as it can.
However, this does not mean that Firefox does not have any privacy or security issues.
It does.
They are less in number than other web browsers, but they are still there.
Of course, you can use a VPN service and be done with it.
If you want to go this route, then we recommend IPVanish.
Click here to read IPVanish review.
to sign up for IPVanish from the official right now and start protecting your privacy and security.
But there is more you can do.
This guide will help users to know how they can make Firefox more private and more secure with the help of nothing but a few simple steps.
Mozilla Firefox is a privacy-friendly web browser.
There is no question about it.
But how does it achieve all that?
Why do people trust that Firefox is more secure and private than Google Chrome?
Well, it all comes down to the simple fact that Mozilla Firefox is an open source piece of software.
And researchers have audited the web browser multiple times.
On the other hand, Google Chrome along with Apple Safari, Internet Explorer and Microsoft Edge all are proprietary web browsers.
Since Mozilla Firefox is open source and has no corporation behind it that wants it to make money, Firefox doesn’t really have a need to track users.
And so, Firefox does not track users and their activities on the internet.
But there are lots of other reasons why Firefox has gained so much popularity over the last couple of years.
One is the fact that it gives privacy-heads a lot to chew on.
The other reason is that it has a lot of privacy related add-ons.
These are available from the official Mozilla Firefox add-on website.
The best thing about these add-ons is that they can provide users with a great deal of security and privacy as far as their browsing habits are concerned.
Additionally, Firefox also offers deep configuration settings.
These settings make it possible for users to tweak the Firefox experience according to their own security and privacy needs.
Firefox allows advanced users to set up parameters in order to achieve optimal privacy and security.
Table of Contents
WebExtensions
What are these?
Well, first readers should know that in the last couple of months or so, Firefox has made a lot of efforts to transition away from the web browser’s older add-ons framework.
Now it has these WebExtensions.
Users who have downloaded the new Firefox 57 or Quantum, should know that now they cannot use any old extensions except for the ones that are on the Web Extensions add-on website.
But that doesn’t mean all older add-ons are useless.
Developers have worked hard and have transferred some of the old add-ons to the new framework.
Chances are that you will find all the necessary extensions on the new platform.
If you can’t then there is very little doubt that Firefox developers will bring those extensions to the new framework very soon.
There is a very helpful site called “Are We WebExtensions yet?”(Defunct), you can go to this website and find out all the latest news about all the older add-ons that have managed to make the switch and are available on the new Firefox platform.
Understand things like Web Browser Fingerprinting
The problem with using modern operating systems and web browsers is this:
They can help anyone with enough skill to identify you.
How is that possible?
Well, look, each online consumer has (to some level or another) configured his/her web browser according to his/her own needs.
That is especially true in terms of the plugins that the user has installed on his/her web browser.
Add to that the fact that it is not hard to find out the user’s operating system details.
Combine information from both the setup of the operating system and the setup of the web browser, and it becomes worryingly easy for someone with enough skill to uniquely identify users.
Once someone has identified you, they can track you.
And web browsers along with operating system details can allow that to a high degree of accuracy.
This is also a good time to mention one specific ironic and insidious aspect of web browser fingerprinting.
The more a user makes efforts to stop tracking and everything else (probably with the help of all the Firefox add-ons that protect users from tracking and spying), the more unique the user’s web browser fingerprint becomes.
So what’s the best line of defense against problems such as web browser fingerprinting?
Well, no need for any difficult solutions.
The most pain-free way to do it is to use as plain vanilla and common version of a given operating system and web browser as is practically possible.
This is where hardened web browsers such as Tor browser can help.
It is best to use Tor browser without the Tor function as that is what most security experts recommend to users who want to reduce browser fingerprinting.
So that’s it?
Nope.
There is one unfortunate aspect of using Tor browser:
It opens up the user to various other forms of cyber attacks.
Moreover, using Tor browser will also affect the day-to-day functionality of the web browser as well as the user’s computer.
Eventually, a point will come when the user will find the idea of using Tor browser for daily tasks as impractical.
Grand List Of Things To Do After Installing Mozilla Firefox
First, Go Ahead And Disable An Option Called Telemetry
What is Telemetry?
Go here to learn more about Telemetry.
The default Firefox settings ensure that the web browser will collect some amount of telemetry data and information on the user.
Most of the time, this will not cause the user any harm.
In fact, Firefox does that in order to improve the browser’s performance in certain areas.
But the problem with collecting data in such a manner is that it causes privacy issues.
And because of those privacy implications, Mozilla recently decided to make data collection related to Telemetry information an opt-out feature.
It means if the user wants to then he/she can opt out.
Isn’t that shameful or what?
If Mozilla Firefox really wanted to give users more privacy then it should have made the feature opt-in rather than opt out.
So now, we’re going to guide you on how to disable telemetry for Mozilla Firefox (the desktop version).
Follow these steps,
- Open Mozilla Firefox
- Click the menu button.
This usually comes in the form of three horizontal bars located in the top right corner of the web browser window. - Then go to Options
- And then go to Privacy & Security
- After that click on Firefox Data Collection
- And take a look at the options there.
- You should see two options.
You are free to uncheck or check them both.
For Android users, they will have to,
- First, go to Menu from the Firefox mobile browser for Android.
- Then tap on Settings.
- And then on Privacy
- After that, they should tap on Data Choices.
- Now, users should see three choices.
They need to uncheck all the three Data Choices
We will also talk about how to disable Telemetry via the Firefox about.config page.
Read on to find out more about that technique.
But first.
Change Your Web Search Engine
This is important.
Mozilla Firefox, starting with Quantum, changed its default search engine from Microsoft Bing to
Google.
No one can doubt the financial reasons Firefox had to deal with in making this move.
But the thing is, neither Google nor Bing are reasonable choices when it comes to user privacy.
The only fortunate part about this particular problem is that it is fairly easy to modify Mozilla Firefox default search engine.
All that users have to do is to,
- First, go to Menu
- And then to Options
- After that, to Privacy & Security
- And then to Default Search Engine
- At this point, Firefox will show users the list of available search engines.
Users can change the settings for the search engine from the given dialog box in the shape of a drop-down list.
The other thing users need to remember here is that using the same options window they can also modify the One-click options for web search engines.
Firefox also allows users to add search engines that aren’t on the default list.
Moreover, there is another way to remove or add search engines.
Click here to read out the alternative method.
Another thing readers need to note here is that from Mozilla Firefox 57+ onwards, each time the user will update the browser (which the user must do, of course), Firefox would automatically switch back to Google as the default search engine.
Do you want to prevent that?
Well, then,
- First, open up Firefox
- Go to Menu
- And then to Options
- After that go to General
- And then look for the option where it says Allow Firefox to
- Then uncheck the option that says Automatically update search engine.
We have talked a lot about what you should do if Firefox has automatically selected the default search engine for you.
But that raises the obvious question:
Which default search engine should you have?
Well, there are lots of options available.
If you must use Google for workplace and such, then do so.
But if you want some privacy while searching for other sensitive topics then use DuckDuckGo.
Enable Global Tracking Protection
Firefox has offered users a decent amount of tracking protection since the year 2015.
But for some reason, it went ahead with hiding the option for users who wanted to enable it in the browser’s about:config page.
Thankfully, Firefox Quantum 57+ has brought tracking protection back to the browser’s main interface.
However, the default settings make sure that Firefox only enables this feature in the Private Browsing mode.
So how to enable tracking protection in Firefox at all time?
Well, the best way to enable tracking protection is to,
- First, go to Firefox
- Go to Options after opening the menu
- Then go to Privacy & Security
- And then look for the option that says Tracking Protection
- When there, check the box that says Always.
For users who are on the Android platform,
- First, open Firefox for the Android platform
- And then go to Menu
- After that go to Settings
- And then go to Privacy
- After that go to Tracking protection
- When that is done, click on Enabled
Users should note that turning on the tracking protection brings lots of other benefits.
According to one study, tracking protection allows users to enjoy a total of 39 percent data usage reduction and 44 percent median page load time reduction for the top 200 Alexa news sites.
That is quite a boost.
How To Turn On Do Not Track
Another useful feature.
Most web browsers, or at least the majority of the mainstream ones, offer the Do Not Track feature.
So it is no surprise that Firefox does so as well.
Sometimes the Do Not Track feature is referred to as the DNT option.
When users enable this option, it will allow Firefox to request various websites that the user’s visits to not try and track the user.
With that said, users should know that even though Firefox will make the request, websites may or may not comply.
It is entirely voluntary.
The other sad fact is that most websites routinely ignore Do Not Track requests.
Of course, users should not expect any harm from enabling the Do Not Track option.
Besides, they may come across websites that respect the user’s DNT request.
To enable the DNT option,
- First, make your way to Firefox
- Open the Menu via the related button.
- And then click on Options
- After that make your way to Privacy & Security.
- And then to the option that says Tracking PRotection.
- Under this heading, you need to look out for radio buttons under Do Not Track.
Check the Always button.
If you are using Firefox on the Android platform then,
- Open Firefox
- When that is done go to Menu
- And then to Settings
- After that hit the option that says Privacy
- And then tap on the option Do Not Track.
How To Disable WebRTC
Another important step.
The WebRTC term stands for Web Real-Time Communication.
Potentially, the WebRTC is a fairly useful standard.
WebRTC enables web browsers to properly incorporate advanced features such as P2P file sharing along with video chat and voice calling directly from the user’s browser.
Let’s take an example.
Some of you might have heard about Firefox Hello.
It is a new chat and video client.
Firefox Hello is for users who want to talk to anyone else in a secure manner.
All that the two participants need is an updated version of Firefox, Opera and/or Chrome.
Participants don’t need anything else.
They don’t need any kind of add-on or a software application.
Users don’t even need to worry about configuring any type of new settings.
For all the VPN users, this is definitely bad news.
Why?
Because standards such as WebRTC enable a given website (this could actually be another WebRTC online service) to detect the user’s host machine original IP address directly.
It doesn’t matter if the user is making use of a VPN service or a proxy server.
WebRTC has the ability to know what it wants to know.
We have already mentioned the fact that WebRTC is a potentially very useful standard.
So it is regrettable that the only viable method for users to prevent WebRTC from leaking their original IP address when they want to use a VPN service is to simply disable WebRTC in their browser.
They will have to do so completely.
But life goes on, doesn’t it?
So, to disable WebRTC, users need to,
- Type the text “about:config” directly into Mozilla Firefox’s URL bar.
This will allow Firefox to allow users to enter the browser’s advanced settings. - After that users will have to change the value of media.peerconnection.enable to false.
We’ll talk more about the about:config page in some of the later sections.
Just keep in mind that this method will work for Android and Desktop version of Mozilla Firefox.
There is a multitude of Mozilla Firefox browser add-ons which have the ability to disable options such as WebRTC.
One of those add-ons is uBlock Origin.
And of course, NoScript.
An Optional Step Is To Remove DRM
What does this option even mean?
Let’s talk about it a bit more.
Users who want to watch videos on online streaming sites such as Hulu, Amazon Prime, and Netflix cannot do so without the use of DRM.
Or, Digital Rights Management.
The DRM is actually responsible for encrypting the content that users want to watch.
Moreover, it protects all copyright issues with the content by limiting the things users can and cannot do with the content.
Mozilla Firefox went ahead with the decision (a controversial one) of including the DRM feature in the web browser way back in the year 2015.
Some still believe that Firefox had good reasons to make the decision.
In other words, looking at the issue from Mozilla’s side, it was perhaps understandable.
Some may consider the ability to play premium content from streaming sites such as Netflix as something of a necessity.
And Firefox did nothing wrong to cooperate with all its rivals by offering the DRM feature.
There is no doubt that this decision from Firefox infuriated a lot of people in the community.
Why?
Because the DRM feature required Mozilla Firefox to bundle together code which was closed source along with Firefox’s own code which as open source.
It is also true that the closed-source code probably did not do anything nefarious.
It only helped the web browser to do what it purported to do.
The fact is, the DRM code can’t do any harm to the user’s privacy.
Because Firefox still controls the whole web browser, DRM is restricted to doing what it is supposed to do.
Even if the DRM close-source code wanted to do something nasty it could not.
Of course, that is not enough for privacy-heads and open source purists.
A major chunk of them still wants Firefox to remove the closed source DRM code from the web browser.
Users should note that if they go about disabling the DRM code, it will hit Firefox’s functionality.
How?
Well, without DRM, Firefox would not have the ability to play content that has DRM protection.
In any case, here we go,
- First, open up the Desktop version of Firefox
- And then go to Menu.
- After that go to the option that says Settings.
- And then go to General.
- When that is done make your way to DRM or Digital Rights Management Content.
- Once there, users must look at the option that says Play DRM-controlled content and disable/uncheck it.
Once the user has followed the process described above, it will lead to the removal of all DRM HTML5 code form the user’s HDD.
Let’s get on with further steps.
- Go to Firefox Menu
- And then go to Add-ons
- After that click on Plugins
- And then make sure that the option of Shockwave Flash has “Never Activate” written in front of it.
In other words, change the option to Never Activate. - Then bring Mozilla Firefox URL bar into focus.
Type about:support into it. - Then hit enter
- And then do a bit of scrolling until you come to the option that says Application Basics.
- From here go to Profile Folder
- And then look at the button that says Open Folder and hit it.
- Once you complete the previous step, you should see your operating system opening up the Firefox Profile Folder.
- Here the user needs to find the option/subfolder that says gmp-eme-adobe.
And then delete it. - Do the same (find and then delete) to the option/sub-folders that say gmp-widevinecdm.
- Then just restart Mozilla Firefox.
People who are using the Android platform should know that it is very hard, if not impossible, to remove all Digital Rights Management code from Firefox Android.
However, what users can do is to install something called Fennec F-Droid.
It is available via the official F-Droid repository.
The Fennec F-Droid has the latest Mozilla Firefox release as its fork base.
But it goes through the trouble of stripping out all the closed-source code from Mozilla Firefox (that is, the Android version of Firefox).
And that includes the Digital Rights Management code.
List of The Best Mozilla Firefox Security And Privacy Add-ons.
Keep in mind that all Firefox browser add-ons are open source and free.
Some like to refer to this fact as FOSS or Free & Open Source Software.
Ad Blocker uBlock Origin

There are lots of reasons why uBlock Origin is better than Adblock or Adblock Plus or all the rest (except for Adguard which is equally good).
But one of the biggest reasons is that it is lightweight.
At the same time, it is also very powerful as far as ad-blockers go.
Additionally, it doubles up as an effective anti-tracking tool as well.
Just use uBlock Origin and you have yourself an excellent ad blocker as well as anti-tracker.
uBlock Origin makes use of several blocking lists.
It uses those lists to filter all types of unwanted content from even appearing on the user’s web browser window.
The default lists that come pre-installed with uBlock Origin are pretty comprehensive.
But we usually recommend users to go ahead and add some other blocking lists such as those from Fanboy and EasyList.
With that said, users should know that sometimes if an ad-blocker blocks ads it breaks the webpage.
Blocking tracking scripts could lead to similar outcomes as well.
So how does uBlock Origin deal with that?
Well, it gives users the ability to whitelist any given element or webpage on the fly.
And it is indeed a very handy feature.
Users also have the facility to specify which type of elements they want uBlock Origin to block.
Users could toggle on or off,
- Remote fonts
- Cosmetic elements
- Media elements which are large
- Pop ups
There is also the Element picker feature.
For those who want more options, there is the Element Zapper feature as well.
These are basically modes that users can turn on in order to customize what they want to permit and/or to run on any given website or webpage.
Privacy Badger.

The first thing you should know about privacy badger is that, the EFF (The Electronic Frontier Foundation) has the development entity behind it.
That alone gives it a lot of reputation points.
Apart from that, it is a pretty impressive anti-tracking add-on.
Moreover, it also can double up just like uBlock Origin as a pretty effective ad-blocker.
Now, on the face of it, these two add-ons do overlap in some of their functionality.
But our research shows that uBlock Origin and Privacy Badger actually complement each other pretty well.
Hence we recommend to users that they should run uBlock Origins and Privacy Badger together in tandem.
Privacy Badger doesn’t really make use of blocklists.
What it does is it keep a track record of various scripts that developers embed in their web pages.
When a time comes that Privacy Badger had managed to detect a source that has tried to track the user it jumps up into action.
Then it tells the user’s browser to try and not load that source or any content that is coming from that source.
The other benefit of using Privacy Badger is that it enables users to actually see the kind of tracking scripts that have made their way to any given web page these days.
Moreover, it will also show users which of those tracing scripts are trying desperately hard to track the user.
The user then has the option to decide how should Privacy Badger deal with all of those tracking scripts.
Privacy Badger gives the user the option of blocking cookies or allowing them or blocking everything.
Users can do that OR they can just sit back and relax and let the likes of Privacy Badger decide if it should load some content from a given source or not.
The HTTPS Everywhere Addon

If a user is concerned about privacy and security then this add-on is an absolutely essential one.
Who developed it?
Again:
Electronic Frontier Foundation.
In other words, it is 100 percent legit.
HTTPS Everywhere has a very basic task.
That task is to ensure that users never connect to a given website without the help of an HTTPS (secure) connection.
Of course, if an HTTPS connection is not available then there is nothing that HTTPS Everywhere can do.
But here is the thing:
HTTPS Everywhere works because of the fact that the majority of the good websites nowadays do accept users who want HTTPS connections.
Now, even though we have said that, it is also true that if the user does not ask for an HTTPS connection then most websites, by default, use the regular and insecure HTTP connection.
Users need to make sure they understand that HTTPS Everywhere will only work if there is an HTTPS connection option.
If there isn’t then HTTPS Everywhere will just move out of the way and connect to the website using the insecure HTTP connection.
To counter this problem HTTPS Everywhere offers an option to users where they can specify if they want HTTPS Everywhere to connect to the website if it does not have the HTTP connection option.
In short, it is a fantastic idea to keep a watchful eye on the web browser’s URL.
More specifically, watch out for the padlock icon.
The padlock icon, right beside the URL bar, shows if the user’s connection is HTTP or HTTPS.
NoScript
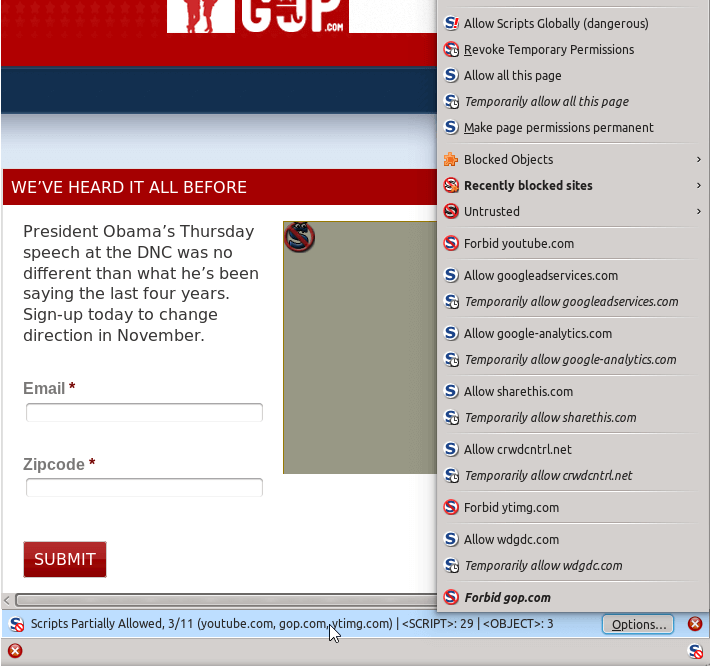
The NoScript Firefox add-on is one potent privacy tools.
What does it do?
It gives the user unparalleled and comprehensive control over the type of scripts that websites are allowed to run on the user’s web browser.
With that said, NoScript can break websites.
In fact, it does break websites.
Most of the modern websites don’t have the ability to play game with add-ons such as NoScript.
Hence, if you want to use this add-on then you will have to have a good bit of technical knowledge.
Only then can you tweak and configure NoScript in order to make it work so that it does its job sufficiently well.
NoScript add-on makes it relatively simple for users to use the whitelist and add exceptions.
However, if users don’t understand the actual risks involved with whitelisting a given website, then even this feature would require prior study material.
What we mean to say is that NoScript add-on is not for your average casual online consumer.
It is a powerful tool for power users.
It is for web-savvy users rather than users who just want to watch YouTube and perhaps search a bit via Google.
As far as functionality goes, we don’t know of too many tools that can challenge that NoScript has to offer.
Users should also note that if they make use of NoScript, then they don’t really need to use other Firefox add-ons such as uMatrix, Privacy Badger and/or uBlock Origin.
There are a lot of guides on the internet that show the user how to use NoScript without any problems.
So have a look at those if you are willing to try NoScript.
As mentioned before, NoScript has a ton of features.
But there is one specific feature which we want you to give special attention to.
That option is called Allow Scripts Globally.
You see even if you use this option, there is still some benefit in installing NoScript.
Why?
Because if you don’t use NoScript to block regular scripts, NoScript will still play its part in protecting the user against all the nasty things that the internet can throw at the user.
We’re talking about nasty things such as,
uMatrix
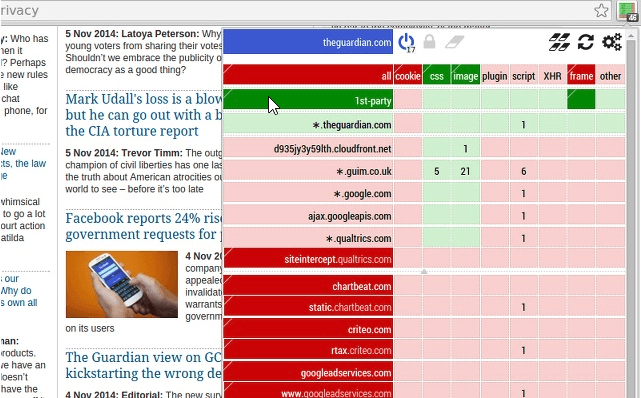
uMatrix is another Firefox add-on.
The development team that has brought us uMatrix has also given us uBlock Origin.
So you don’t need to worry about the people behind uMatrix.
What is uMatrix?
It turns out, uMatrix is best described as a cross between NoScript and uBlock Origin.
In other words, it offers users a ton of features when it comes to customizable protection.
However, just like NoScript, it requires the user to do a good amount of work before it can work properly.
And for any user to tweak it sufficiently, he/she has to have the proper know-how.
Otherwise, a novice user cannot set up uMatrix appropriately.
Don’t get us wrong.
Configuring uMatrix is nowhere near as difficult as NoScript.
Moreover, uMatrix tends to not break websites as much as NoScript.
But then again, this comes with the disadvantage of less protection.
NoScript is more comprehensive than uMatrix.
Again, we would like to remind our readers that if they somehow manage to configure uMatrix, then they don’t really need to install other Firefox add-ons such as Privacy Badger and uBlock Origin.
They won’t even need NoScript if they set up uMatrix right.
Cookie AutoDelete
Cookie AutoDelete can act as the perfect drop-in replacement for another Firefox add-on by the name of Self-Destructing Cookies.
So if it is such a good replacement why didn’t we tell you to install Self-Destructing Cookies?
Well, the reason is simple.
Self-Destructing Cookies is now defunct.
It doesn’t work anymore.
What does Cookie AutoDelete do?
Cookie AutoDelete removes regular HTTP cookies from the machine automatically when the user closes the web browser’s tab.
This is the same tab that set those cookies in the first place.
So don’t think too hard about it.
Cookie AutoDelete offers a high level of online protection from all sorts of tracking that takes place via cookies.
The best part about using Cookie AutoDelete is that it does not break websites.
Other add-ons mentioned in this list, for the most part, do.
Cookie AutoDelete is also great because it also protects users against other problems such as,
- ETags
- Flash/zombie cookies
It can even clean out DOM storage.
But it can’t do the same for localstorage.
Yet.
Another thing we would like to point out here is that Better Privacy and Cookie Auto Delete both complement each other’s functionality.
You can use them both if you want to.
BetterPrivacy (Not available anymore)
BetterPrivacy is the Firefox add-on you want if you want something to control those flash cookies.
Users will have to configure it first before it can begin to remove Flash cookies from the user’s computer automatically and that too on a daily basis.
Some experts have argued that BetterPrivacy is nothing but a redundant add-on.
Why have they said that?
They have said that because most websites now do not use Flash.
Before, almost every website used Flash.
Our research shows that if you care about your security and privacy then it is always better to be safe than sorry.
In other words, Better Privacy is still worth a go.
We recommend that you should install this add-on along with the earlier one, Self-Destructing Cookies and make them work in tandem for a greater effect.
Update:
The author of Better Privacy has removed the addon from the official Firefox repository.
Why?
Like we told you before.
Everything is moving to WebExtensions.
Currently, the WebExtensions version of Better Privacy is still in beta.
With that said, Security Gladiators is more than hopeful that this add-on will reappear very soon in the future.
User-Agent Switcher and Manager (Not longer available)
Use this instead: User-Agent Switcher and Manager
What is this Firefox addon for?
Well, let’s explain that a bit.
Any web browser has a user agent.
What’s a user agent?
Click here to find out.
The user agent essentially tells a given website the type of machine that the user is on.
It also tells websites about the operating system that the user is running.
Along with that, it provides websites with information on which web browser is user has installed on his/her operating system.
A lot of modern websites use this kind of information in order to optimize their web pages for users.
This allows websites to perform faster.
And better.
They are more interactive so to say.
Now, although this information improves user experience, it doesn’t do much for privacy.
In other words, the user agent is the main culprit for a privacy problem we previously called web browser fingerprinting.
We’re not saying that all websites do this.
But they can.
And that is enough for a privacy-conscious user to take action.
What kind of an action can you take?
You can install User-Agent Switcher and Manager.
What does it do?
It changes the information that the user agent has to give to any given website.
To take an example, User-Agent Switcher and Manager can inform a website that the user is accessing the website via an iOS/iPhone device and is using the web browser Safari.
In truth, the user may be using a Windows machine with Firefox as the browser of choice.
Sounds great right?
Right.
But not so fast.
Security experts have long debated how User-Agent Switcher and Manager can prove its effectiveness.
They believe that User-Agent Switcher and Manager along with all other similar add-ons that promise users to prevent privacy issues such as Browser Fingerprinting don’t have enough about them to provide total security from such problem.
There is no doubt about the fact that unmodified and standard web browser like the one we mentioned before, the Tor Browser, provides more protection than all the mainstream browsers.
But the problem is this:
If the user is using several add-ons via the web browser then that makes the user more unique.
And User-Agent Switcher and Manager can just move in and adjust the user’s USER AGENT in order to change the information.
If you are not using a ton of add-ons then the user agent isn’t going to do much.
Canvas Defender
We’re going to stick with privacy problems such as browser fingerprinting for a while.
This is where Canvas Defender comes in.
Allow us to explain.
You now know about browser fingerprinting.
What you did not know, was Canvas fingerprinting.
Browser fingerprinting comes in many shapes and sizes.
The most common form of web browser fingerprinting is Canvas fingerprinting.
Canvas fingerprinting techniques make use of a special script.
This script asks the user’s web browser to draw an image.
The image is hidden.
Then the script gets to work.
It makes use of tiny variations in order to change how the browser draws the image.
In the process of doing so, it manages to generate a code ID that is unique.
Then, it becomes very easy to track any user.
Scared enough?
Don’t worry.
Just use Canvas Defender.
This Firefox add-on will help you prevent such process taking place.
How?
Well, it will first create a persistent and unique noise.
This noise thing will hide the user’s genuine canvas fingerprint.
Problem solved.
Readers should note that at the time of writing this report, Firefox promised users that it would offer users built-in and default canvas fingerprinting protection in the organization’s coming versions of the web browser.
However, we are not going to sit on that.
Firefox will bring it, for sure.
But before it becomes available, users need to make sure that they have Canvas Defender installed on their Firefox web browser.
After Firefox launches its own, Canvas Defender, for all intents and purposes, will become redundant.
We don’t know when that time will come.
Neither do you.
So what should you do?
You should install Canvas Defender.
Plain.
And simple.
Decentraleyes
Decentraleyes is the addon that will improve the user’s privacy levels exponentially.
How?
Well, we have already talked about the problem users can get themselves into while they are browsing the internet in a free-spirited fashion.
Decentraleyes tries to change that.
While the user is browsing, it moves in and hosts CND resources somewhere locally.
After that, when the time comes for the web browser to request one or more of the stored CDN resources, Decentraleyes blocks the application.
Then it proceeds to serve the user a local version.
Okay.
We’ll admit.
What we said above probably did not make much sense to you.
Just keep in mind that the techno-babble you saw above will make sure that you are protected from all angles while you surf the internet stress-free.
Bloody Vikings

This Firefox add-on is probably the easiest way for online consumers to create burner email addresses.
Some call them temporary email addresses.
After installing the add-on all that the user has to do is to right-click in any given email address registration form field.
Then, the user has to choose Bloody Vikings.
Users can also expand the shown options to see all the choices of available services.
When the user does that, Bloody Vikings will go ahead and generate a new temporary email address for the user.
It will then insert that email address into the email form field.
Moreover, it will also open up a new web browser tab.
The new tab will show you the inbox of the temporary email address that Bloody Vikings just created.
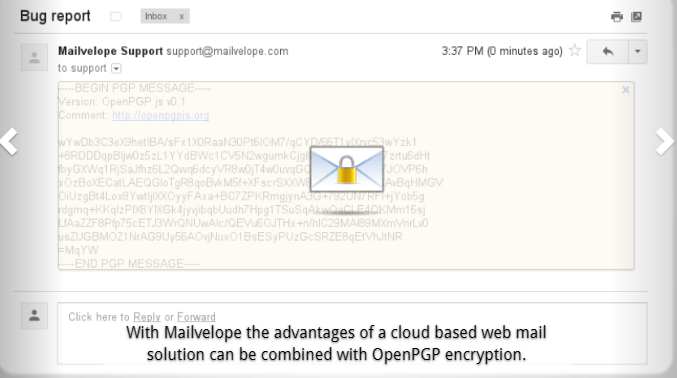
Mailvelope.
You don’t us to tell you that if you want to send private email messages and you want to do so in a secure manner then you better make use of a technology called PGP.
It is the most widely used method.
The problem?
Using PGP to send an email address will be the hardest thing you will ever do in your life short of a Ph.D. dissertation.
That is the reason why so few online consumers opt to use PGP to send their email messages.
It is that big of a pain.
Say hello to Mailvelope.
This simple Firefox add-on helps users to enable end-to-end PGP encryption directly from within the Mozilla Firefox web browser.
Isn’t that great or what?
This extension is compatible with all the major email service providers.
Yes, we’re talking about browser-based mainstream services such as,
- GMX
- Yahoo!
- Hotmail
- Gmail
Mailvelope simplifies the process of implementing PGP.
So much so that you won’t feel any pain!.
However, as with all things in real life, it does have a downside, of sorts.
It does not provide as much security as a PGP with a special and dedicated email client does.
Conclusion
That is it.
For now.
This is your starting point for making your Firefox ultra secure as far as privacy and security are concerned.
If you have more questions or want more tips then please use the comments section below.
We are all ears now.

Given the huge market Chrome browser has. I do not see the majority finding privacy a issue. These are all great ways to make Firefox more secure, but things like DRM are required for Netflix and other video streaming. You simply break functions people actually use just to satisfy privacy. One thing is certain that focusing on privacy hasn’t made Firefox more popular and in fact continues to shed users all the while Chrome continues to expand its dominance. If privacy was on most people’s minds, Chrome would be slowly losing ground to more private oriented browsers. I don’t see users waking up one day and realizing how Chrome is so terrible for privacy, I just don’t think most users care and they have accepted that adding more privacy breaks their internet experience and most don’t want that.
Thanks for the comment John,
Couldn’t agree more on second thought.
You raise a valid point.
If people really cared about privacy, they would not choose Chrome.
However, one can’t ignore that portion of the society that does care a lot about their privacy in the online world.
Much appreciated compilation and as far as the GOOG is concerned certainly just because a billion flies eat feces does not mean it is good for you …privacy is one of the most important human Rights that are destroyed by the intellectual cannibals.
Althougheven these addons are not sufficient in a techno fascist reality.
I respect the work Surveillence Valley by Sash Levine that spells out in detail the reality of the spy machinery, called “the internet”
Hi Ian.
Thanks for the comment.
What books have you been reading because that is some pretty interesting stuff right there.
After adding all these plugins and giving them access to my browsing, is it safe to put in my sensitive bank details for making online payments?
Hi Ian Banks.
That’s a good question.
What you should do is disable all extensions when trying to access your banking site.