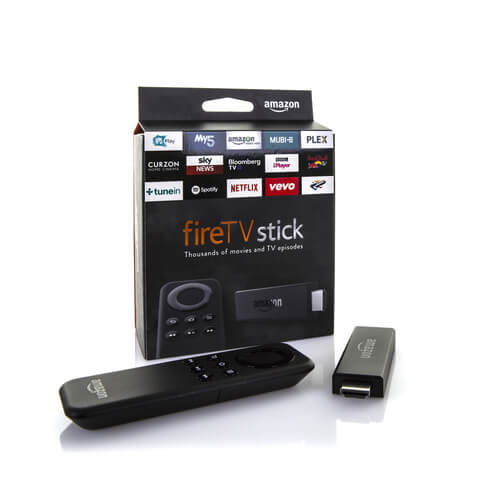
If you want a streaming solution that is both cost-effective and simple to use then Amazon Fire TV is your answer.
Amazon Fire TV is the best way to turn your simple TV into an internet-connected smart streaming device.
Of course, your TV will need a USB port to begin with.
That’s how Amazon Fire TV works.
With Amazon Fire TV you get access to practically an unlimited supply of premium content.
We’re talking about,
- Hundreds of movies
- Documentaries
- TV series
- And more
So what’s the hiccup then?
Well, most of that high-quality content is geo-blocked.
What?
Geo-blocked.
IT means you can’t access that content if you live in some specific countries.
That’s why you need to use a VPN service.
A VPN service will not only encrypt your internet traffic but it will also route it through one of its own intermediary VPN servers.
That VPN server is located exactly where you want it located.
In other words, you can spoof your location.
Streaming sites will, then, not know your original location.
They will only see you from your spoofed location.
In this way, you’ll unlock all the geo-locked content that is available on streaming services and apps like,
- Amazon Prime Video
- BBC iPlayer
- Netflix
- Hulu
- HBO
- And more
Moreover, if you use Kodi on your Amazon Fire TV and Fire TV Sticks (both are different) then you can also successfully hide the destination and content of your internet traffic from the likes of Internet service providers.
You already know that Amazon Fire TV and Fire TV Sticks operate via a fork of Android OS.
A lot of VPN service providers support Android and Android apps.
But Amazon Fire TV is a bit different from most Android media boxes.
To put it another way, it doesn’t really support Google Play.
Hence, you can’t download a VPN app on it.
Moreover, if you have the first generation of Amazon Fire TV Stick, then you can’t use VPN apps on it at all.
This tutorial will show you the best methods to connect your Amazon Fire TV device to a VPN service.
In the process, you’ll also learn how to unblock geo-locked content.
We’ll also teach you how to keep your online activity totally private.
So let’s get to it.
Table of Contents
Best VPN Service Provider For Amazon Fire Stick
Maybe you are new and have never purchased a VPN service before.
In that case, you must make sure you buy the VPN service that fulfills your needs.
And not just go with the one that has top reviews.
Otherwise, you may spend a lot of time configuring a VPN service and getting frustrated.
Mainly, you want to make sure that your streaming service is as quick and buffer-less as possible.
For that you need a VPN service that is fast.
Otherwise, if a VPN service doesn’t provide good speeds, you’re streaming experience will suffer.
Here, you should take note that all VPN services decrease your internet connection’s speed.
That’s just the way they work.
But Elite VPN service providers degrade your internet speed to a much lesser extent.
If you want to use an open-source media player like Kodi on your Amazon Fire TV, then it is also a good idea to use a VPN service.
Again, you don’t want to use just a VPN service.
You should try to sign up for a VPN service that supports all Kodi add-ons.
This VPN service should also protect your privacy.
Otherwise, your ISP will know what you are watching and downloading.
And depending on the laws in your country, this could land you in trouble.
Our extensive VPN research has lead us to this conclusion:
NordVPN is the best VPN service when it comes to Amazon Fire TV and Kodi.
It is one of the fastest VPN services in the world today.
NordVPN is great because,
- It is quick
- Light
- Secure
- Install quickly
- Has an easy setup process
- Great encryption and security
- Great at protecting privacy
- Works with all Kodi add-ons
To sign up for NordVPN right now from the official website .
Remember that not all VPN services work with Amazon Fire TV right out of the box.
You first have to download their app in the form of an APK file.
Why?
Because you don’t have access to Google Play Store on some of these Android media boxes.
We’ll show you multiple methods in which you can install a VPN service on your Amazon Fire Stick.
The fastest methods of these will work inside five minutes.
But before that, we need to set up your Amazon Fire TV the right way.
How To Set Up Amazon Fire TV and Amazon Fire TV Stick For A VPN Service
First, you need to make sure your Amazon Fire TV can install apps that come from unknown sources.
To do that follow the process below,
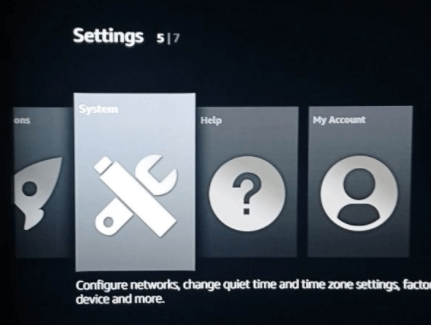
- First, start your Amazon Fire TV device.
Then go to Settings.
And then go to System

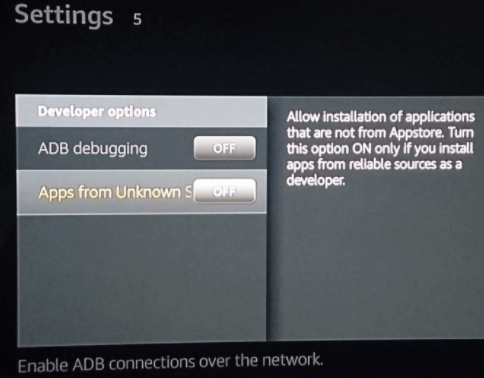
- After that, you need to scroll a little bit and look for the option that says Developer Options

- Now, you need to toggle the Apps from unknown sources option
- Go back to the System menu.
Then make your way to About - Here you need to choose Network

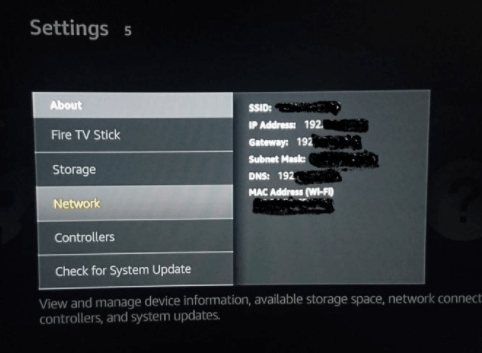
Note down the mentioned IP address.
This is the IP address of your Amazon Fire TV.
You will need this for method 2 of our list of four methods.
As of this moment in time you have done great.
You have enabled your Amazon Fire TV to accept apps that don’t come from Amazon’s ecosystem of apps.
But hang on a minute before you start celebrating.
The most difficult portion of the whole of this guide is the one that involves you installing the VPN app on your Amazon Fire TV.
Why?
Because Amazon made it difficult for users to download APK files.
It also did the same for Google Play Store.
Why?
We don’t know.
All we know is that you can any one of the four methods described below to install a VPN on Amazon Fire TV.
Method 1 (Recommended Method): Install A VPN App With APK File On All Your 2nd-generation Amazon Fire TV Stick.
And you can use the same method to install the VPN app via direct download on some of the newer models of Amazon Fire TV.
This is probably the easiest method of the lot.
If your VPN service provider has an Android APK file, then you can simply download that APK file via direct download.
No need to go to Google Play Store.
What does APK stand for?
APK stands for an Android application package.
Glad we got that out of the way early.
Moving on.
The APK file is basically the installation file format that all Android devices use.
In other words, it is a sensitive file.
And that’s why we recommend that you should always download the VPN APK file from the official website of your VPN service provider.
And not from anywhere else.
If you have NordVPN as your VPN service provider, then there is some good news:
NordVPN provides the VPN APK file on its official website.
You can go it right now.
Again, do not download APK files from third-party websites.
They are usually infected with malware and/or adware.
If you want to install a VPN on your Amazon Fire TV with this method, you will need a download URL for the VPN APK.
And you will need a device that at least belongs to the 2nd-generation of Amazon Fire TV devices if not later.
So, here are the steps you need to follow,
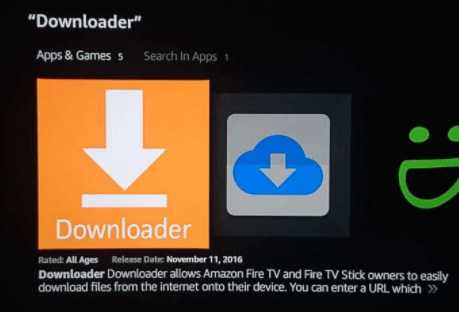
- Start your Amazon Fire TV. And then use the search bar to search for “Downloader”
- Install, probably, the first option that says Downloader App.
It will have an orange logo but that might change depending on when you read this post.

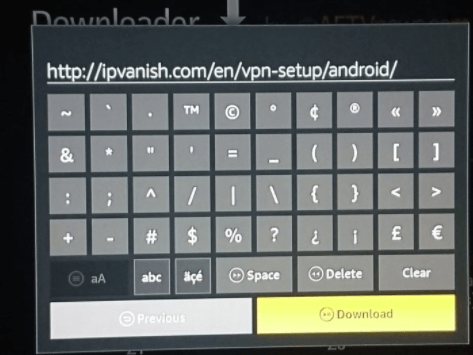
- Then open the Downloader app.
This is where you need to enter that direct APK download URL for your VPN service.

- Now, you need to wait.
The VPN app will install on its own.
If it doesn’t then simply open the Downloads folder in your Downloader app.
And then click on the relevant APK file. - The installation process should have completed by now.
If it is then you are ready to go.
IF you want to know how to find it or how to enable the VPN then you will need to read the Locate the VPN and Then Connect To It section.
VPN service providers, for some reason, don’t always advertise APK files.
So if you can’t find the one for your VPN service provider, just contact the customer support department.
They can usually send you a link to the APK file.
Or they may even send you the APK file itself.
If they send you the file, then you can easily upload that on services such as Drive or Dropbox.
Then you can use the Downloader app on your Amazon Fire TV to install the VPN via that Dropbox or Drive link.
You can even sideload the APK right into your Amazon Fire TV device.
Before that, you will need to plug the Amazon Fire TV into your desktop or laptop’s USB port.
You will also have to drop the relevant APK file to a location that is easily accessible.
Method 2: SideLoad VPN App (For 2nd-generation and later Amazon Fire TV Device) On Your Amazon Fire TV device With Another Android Device
For this method to work, you will need two things:
- Amazon Fire Stick that belongs to the 2nd-generation or later
- Another Android device that is able to access Google Play Store.
Usually, these are devices such as your tablet or smartphone.
First, you will download all the required apps on your second Android device.
Then we will transfer them to your Amazon Fire TV device using Apps2Fire.
Got it?
Great.
Let’s move.
What if I don’t know which version of Amazon Fire TV am I using?
No worries.
Just locate the model name on your Amazon Fire TV.
Usually, the exterior has it written somewhere.
Amazon Fire TV 2nd-generation devices have models names like “LY73PR”.
Here are the steps:
- Run your Android device.
And download Apps2Fire from the official Google Play Store site.
to do that right now.
Then install it - Now you need to download and then install your VPN app on your second Android device.
You will do this via Google Play Store - Launch the VPN app.
And then tap or click on the menu icon which is the shape of three vertically aligned dots.
The menu button is usually located in the top right corner of your screen. - Hit Setup
- Remember, before Method 1 section, we told you to note down an IP address?
Yes?
Great.
Now you need to enter that address under Ip address of your Amazon Fire TV - Then hit Save
- Not click the menu icon again and choose Upload Apps
- Then simply perform a tap on the VPN app you want to migrate to Amazon Fire TV.
This step will upload that app to your Amazon Fire TV. - Now you should see the app installing itself on your Amazon Fire TV.
But you still don’t know how to find the VPN app and then enable the VPN service on your Amazon Fire TV.
This is what we will do in the next section.
Just read on for now.
You don’t need to worry if you don’t have the installed app on your smartphone (second Android device) and only have the APK file for your VPN service.
You can use Apps2Fire for APK files as well.
But the previous method is obviously much easier.
Why?
Because method 1 doesn’t require you to have a second Android device.
Locate the VPN and Then Connect To It (This Is What You Need To Do After Completing Method 1 or Method 2)
Here is what we are going to assume:
You have the VPN app ready and installed on your Amazon Fire TV because you followed one of the two mentioned methods before this section.
Now you just need to log in to your VPN app and connect to it.
The exact steps may change but the process will remain the same regardless of your VPN service provider.
Remember that the VPN will not show up in your device/s top-level Apps menu.
That is unfortunate but also necessary.
To access your app, this is what you need to do.
- Go to the starting menu of your Amazon Fire TV.
- Then go to Settings.
And then to Applications - After that hit Manage installed applications
- Then find your VPN app.
And then select that VPN app.
This VPN app must be the same one that you pushed to your Amazon Fire TV before. - From the resulting submenu choose Launch application
- It is here that you need to log in your credentials.
Depending on your device you may or may not have to use a Keyboard or a controller.

- Now you should have access to your VPN app.
Here you need to select the location of your VPN server and then connect to it by hitting the connect button.
Once the VPN app has established the VPN connection, you’re all set.

Remember, you must keep the VPN app connected until and unless the Amazon Fire TV itself powers off.
Of course, you can always go the VPN app’s menu and disconnect to it but that is not recommended.
If your VPN app has the option of automatic connection then you should turn it on.
Why?
Because it keeps you safe when your internet connection drops and picks up from time to time.
How To Update The VPN App on Amazon Fire TV
Sideloading Google Play apps is not a perfectly great process.
Directly downloading APKS files also have side effects of their own.
In other words, both methods have the drawback of no automatic updates.
That usually is not a problem if your app’s version is stable and secure.
But occasionally you may need to update your app.
In such cases, you must force it to update.
To compare version, you can always go to the information page or about page of your installed app.
Then you should compare your version with the app version that is presently available on Google Play Store.
The process we’re now going to show is will remain the same regardless of which method you chose to follow in the previous sections.
Before you update, you must make sure that your VPN app is not running.
Here are the steps:
- First, run your Amazon Fire TV.
Then go to Settings.
And then go to Applications.
After that make your way to Manage installed applications - Then search for and find your VPN app.
Click on its icon.
And select Force stop - Now, you need to either use method 1 or method 2 and push the app on your Amazon Fire TV.
Then you need to install it. - Now, you should see a page that will ask you if you want to install the updates to your existing application.
It will also ask for new permissions>
Hit Yes. - When the update process finishes, log back to your VPN app.
And then follow the steps mentioned in the previous section to locate and connect to it.
How To Set Up VPN On Any Given Wifi Router If You Don’t Have Access to APK or Google Play
Some user won’t have access to a trustworthy APK file.
Others may not have any access to Google Play Store on their second Android device.
Or maybe another user is working with Amazon Fire TV from the first-generation.
How should they install a VPN on their device?
Well, the available options are limited.
You can use forged device IDs to download APK files from Google Play Store if you use some clever Chrome extensions.
Then you can simply sideload the app with ADB.
But that process is a bit technical.
The other problem with such a method is that Google’s terms of service does not allow such methods.
Therefore, we think, in such cases, you should set up your VPN service on a wifi router.
And leave Amazon Fire TV as it is.
There are two methods to do this.
You can either,
- Set up a virtual router on your desktop or desktop
- Or configure your home network’s wifi router in such a way that it uses your VPN service.
It is much easier to work with virtual routers because they are easier to set up.
But these do require that you have a laptop with which you can route your internet traffic through.
Yes, this method is not exactly convenient but this is your only available option.
If you want to set up a VPN on a real/physical router then you should know that you can’t do that with every router.
Only certain routers will respond in a way that you can set up a VPN on your Amazon Fire TV with them.
And you might face some firmware issues.
Not to mention, it is trickier than any other method.
Of course, all methods are convenient because you have no other choice.
You just have to make sure you configure them properly.
Now, the methods we will show you below will work with all Amazon Fire TV versions.
They will also work for Amazon Fire TV Sticks.
Let’s get to it then.
Method 3: Have A VPN-enabled Virtual Wifi Router And Connect Your Amazon Fire TV To It
Modern laptops have a great utility where they can create their own WiFi hotspots.
Other devices can then connect to these WiFi Hotspots.
If you connect such a laptop to a VPN connection then all devices connected to it will also have VPN protection.
Why?
Because all the internet traffic coming from other devices will tunnel through the same VPN server that your laptop is connected to.
First, we will describe how to set up a virtual wifi router on Windows.
Then we’ll show you how to set up a virtual wifi router on Mac.
After then you can connect any Amazon Fire TV to your Windows or Mac machine.
As mentioned before, this method will work for Amazon Fire TV from the first-generation.
It will also work with Amazon Fire TV Stick.
First, you will need to install the desktop version of your VPN app.
Then you need to install that VPN app on your laptop or desktop.
Remember, you must download the correct version of your VPN app.
That means, take care of your operating system.
Don’t download the Mac version for a Windows machine.
How To Set Up A Virtual Wifi Router Hotspot For My Windows Which Is VPN-Enabled
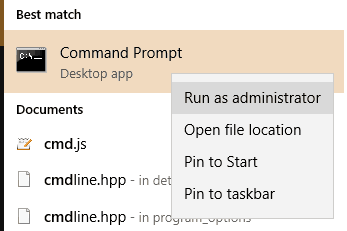
- First of all, you will need to make sure that your computer machine supports a virtual router.
So, to do that, open up your Windows search bar.
And then type cmd in it.
After that right click the Command Prompt.
And then select Run as administrator

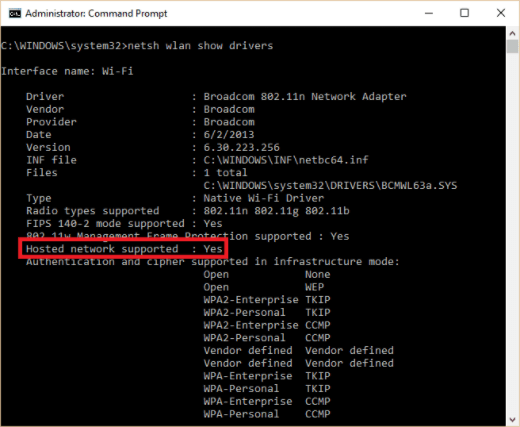
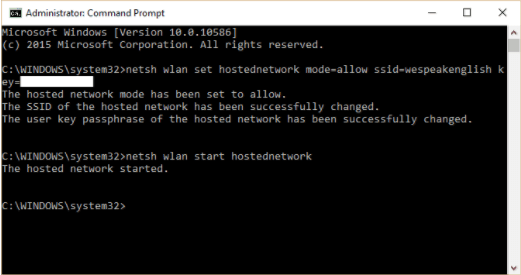
- Then you should see a new terminal window. Type this into it:
netsh wlan show drivers.
Then simply hit Enter - From the information provided to you on the screen, you must find the line which says something like Hosted network supported.
If it has a Yes in front of it then you’re golden.
If you don’t have a yes on it then you will have to set up a VPN connection on your actual/physical router.
You should move to the next method 4 then.
- We’re going to assume here that you are still inside your terminal window.
If you are, then type this,
wlan set hostednetwork mode=allow ssid=<NETWORK> key=<PASSWORD>
You must replace NETWORK above with the name of your network and PASSWORD above with your choice of password.
Then press Enter.

- The screen should now have some text for you which will indicate if the process finished.
If the process successfully finished then your virtual router now exists.
Now you need to turn it on.
To do that type, netsh wlan start hostednetwork
And press Enter - If the next message on your screen says something like the hosted network started then great.
However, if you don’t see the message then you must update the drivers for the network adapter.Then try the whole process again.
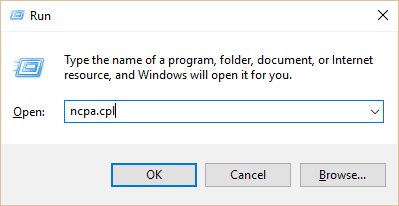
- Now, we must make sure we share the newly-created virtual router with your other devices.
To do that, first, press Windows Key plus R.
Then type ncpa.cpl in the resulting Run prompt.
Then press Enter.

- Now you should see a list of connections.
Search for the connection that you just created.
This connection will have the same name that you input in step 4.
Keep a note of the name of this new connection as we will use it again.
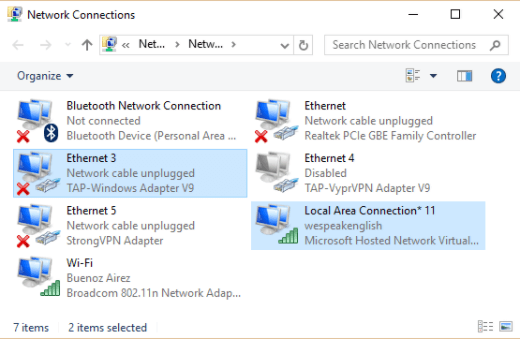
- You should have the same screen that has the list of connections in front of you.
Search for the option that says something like TAP-Windows Adapter.
Perform a right-click on it.
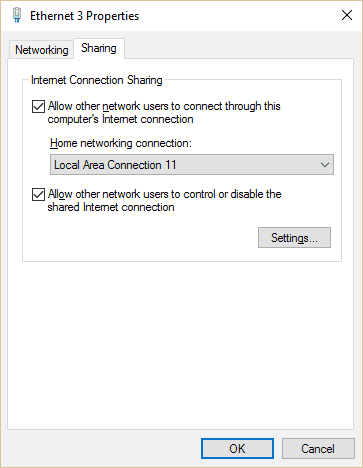
And then choose Properties. - Now to go Sharing tab which is located at the top.
Check the box that says Allow other network users to connect through this computer’s internet connection.

- Look for the Home network connection drop-down menu heading.
Click it to open the drop-down list and then choose the network that has the same name as you have (from step 8 and step 4 before that.)
Then hit OK - Now you must open the VPN app.
Choose OpenVPN as your default protocol.
You can find it in the Settings menu of your VPN app.
Then connect to a US located server.
The OpenVPN protocol will automatically activate the TAP Windows Adapter - Congratulations, you can now use your PC as a VPN-enabled WiFi router
How To Set Up WiFi Virtual Router HotSpot On My macOS Which Is VPN-Enabled
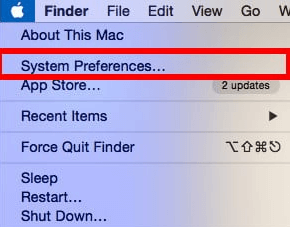
- Look for the Apple icon.
When you find it click on it to go to system menu.
Then hit System Preferences

- When you have done that, search for the Network icon in the resulting System Preferences window.

- There is a small plus sign in the bottom left corner of the Network window.
Click on it.
This will enable you to add a new network service.
You should now see a pop-up window.
In this window, you must set the Interface option to VPN.
Set the VPN Type option to L2TP over IPSec.
And set the Service Name to whatever you like.
- Hit Create.
To go through the next couple of steps quickly you must know your VPN username, along with the password and the server address.
You will most likely need an IPSec key as well.
Of course, this will also depend on your VPN app’s settings.
If you wish you can refer to it as a Shared Secret or Shared Key.
To find these you must go to your VPN service provider’s official website and then look for the Manual Configuration section.
Good VPN service providers will also provide you with a list of servers. - When you click Create, you will see another window with lots of input fields.
You must input the following information regarding details,
Set Configuration to Default.
Then set Server address: the server address that your VPN service provider gave you.
Set Account name: your username.
And set Encryption option to Automatic.

It doesn’t matter much if you choose 40 bit or 128 bit.
- Now you must find the box that says Show VPN status in menu bar.
Check this box.
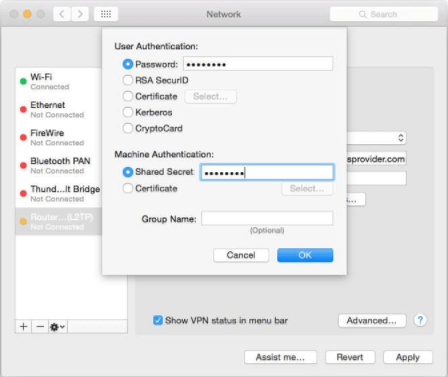
This will enable you to see the status of your VPN connection in the operating system’s menu bar. - Select Authentication Settings.
This will show you the User Authentication screen.
Here, you need to enter your password in the given box.
IN the Shared Secret box, you must input your IPSec key.
The Shared Secret box will be under the Machine Authentication option.
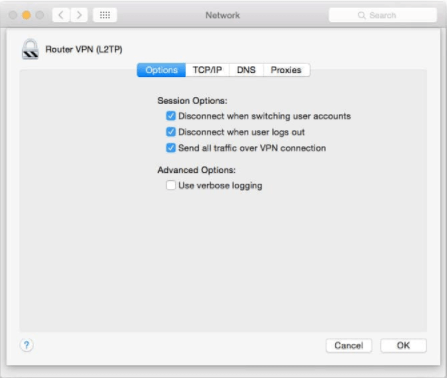
Hit Okay after you are done with Authentication Settings. - For this next step, you must click on Advanced…
Then look for the option that says Send all traffic over VPN connection. Check it.
And then select OK.

- Hit Apply if you want to save all your settings. And you should save all your settings.
Then connect to your VPN service by hitting the Connect button.
Now you should be connected to your VPN server.
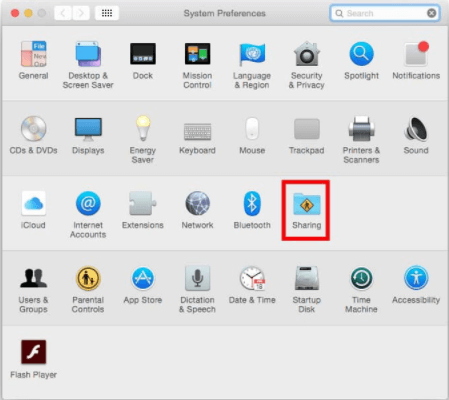
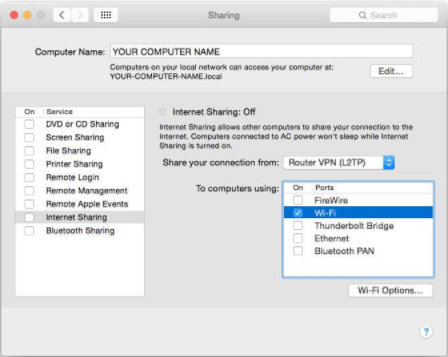
After this, all you need to do is to set your VPN connection to the Sharing settings. - Go back to your System Preferences menu.
Then hit Sharing.
- Look at the panel on the left.
Select Internet sharing from it.
You should see Internet Sharing options now.
These should show up on the right side of your screen.
Set Share your connection from: Your earlier VPN L2TP connection from previous steps (step 3).
And to computers using : Wi-Fi

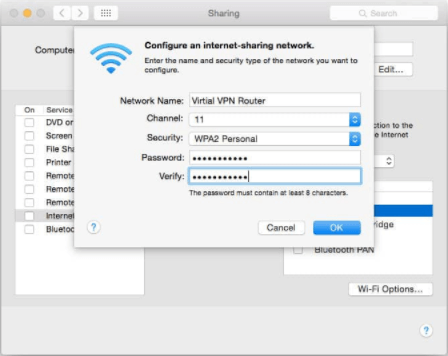
- Now choose Wi-Fi Options.
Input details as shown below,
Network Name: choose an appropriate name for your network. It is also known as SSID
Channel: leave this option to the default value
Security: set this to WPA2 Personal
Password: Select a password you can remember and hard to guess.
Verify: enter your chosen password again

- Then hit OK.
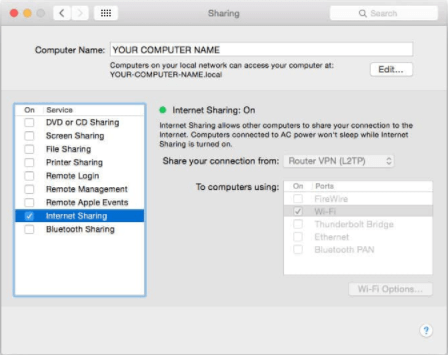
Now, look at the Sharing menu.
Look for the option that says Internet Sharing. Check the box next to it.
If you completed the previous step, you should see a prompt.
The prompt will ask you to turn on Internet Sharing.
Hit Start.
If you followed the previous steps correctly, you Internet Sharing will get activated.
And you will see a green light right next to a piece of text that says Internet Sharing On

- Look at your menu bar now.
You should have two new icons.
The first of these icons will display the VPN connection status.
The second icon will display the Internet Sharing status.
- Open your VPN app and then hit connect.


Click on the WiFi icon.
What do you see?
Right.
You should notice that it isn’t searching for any available WiFi networks.
Why?
Because of internet sharing.
The WiFi icon will tell you that your machine has Internet Sharing set to on.
IT will also show the name of the new WiFi signal that your Mac machine is currently broadcasting.
In our case, our SSID is Virtual VPN Router.
It is also the wifi channel our WiFi signal is making use of.
If you want to connect any of your devices to this new WiFI router then do so as you would for any other WiFi signal or router.
Use the relevant SSID and password.
You chose these login credentials in the steps above so this shouldn’t be difficult.
Method 4: Connect Amazon Fire TV To My VPN-enabled Physical WiFi Router
Here is the problem:
Each WiFi router comes with its own instructions on how to set up a VPN service on it.
So we can’t have a step-by-step guide for that.
WiFi routers come in all shapes and sizes.
Some have different firmware than others.
In other words, some WiFi routers don’t support VPNs.
Those that do support VPN services have a unique configuration process.
So first, check if your Wifi Router has VPN support or compatibility.
To check for VPN support, check your router’s bottom.
Or back
Find out its local IP address and the relevant login information.
Or use Google.
It can help you to find the default credentials for your WiFi router model.
If nothing else, try to type 192.168.0.1 or 192.168.1.1 into the address bar or URL bar of your internet browser.
Most of the time, the default username and password is admin.
That is, your username is admin and your password is also admin.
So, log in to your router’s firmware.
Then search for VPN configuration options.
Let’s say you have an L2TP/IPSec VPN connection.
Then, you will need the following for connection,
- Server address
- Shared secret key
- Username
- Password
What if your router doesn’t support any VPN connections?
Well, then you will have to replace its firmware.
Check if you can do that.
If you can then change it to one of the following,
- Tomato
- DD-WRT
- OpenWRT
What do you call this process?
Well, if you replace the manufacturer’s firmware on your wifi router then basically you have flashed your wifi router.
In other words, it is called flashing.
Exercise due caution if you do end up flashing your wifi router.
Always make sure that your wifi router is compatible with the firmware you want to download for it.
Don’t mess this process up.
Otherwise, there is a chance that you might lose your wifi router forever.
To put it another way, screwing your firmware modification process may render your wifi router unusable.
What if you don’t want to flash your router but still want a VPN connection via your router?
Well, there is no other choice but to buy a router that is pre-flashed.
A lot of good VPN service providers offer such routers.
Usually, they come as a part of their service packages.
On a side note, in order to get every feature and addon possible on kodi and to not get sued if you accidentally watch something pirated, you need a VPN. You can find the 5 best VPN’s for Kodi here.