In many ways, DNS servers perform some of the most critical tasks in ensuring internet users can get things done. One of the responsibilities of DNS servers is to translate domain names into numbers or IP addresses that computers/servers can understand. DNS servers also hold records, store information on how to find specific DNS records, manage DNS databases, provide answers to DNS requests, and facilitate communication between computers and humans.
But what is a DNS server? What are the types of DNS servers? And what are the best DNS servers on the market? All of these questions will be answered in the subsequent sections.

Table of Contents
What is a DNS Server?
A DNS server, as the name suggests, is a server. The DNS server essentially provides services to other programs. Such programs are also known as clients. Most, if not all, mobile devices and desktop computers have DNS clients. DNS clients help users (more specifically, web browsers of all sorts) communicate with DNS servers, enabling internet users to go to different websites and consume content or complete online tasks.
What is the Purpose of a DNS Server?
The purpose of a DNS server is to act as the internet’s phonebook. Any time a given user inputs the name of a website (such as securitygladiators.com) into the web browser’s URL bar, the DNS kicks into action to find the IP address that takes the user to the intended website. Web browsers can only access information on websites because DNS clients are able to communicate with CDN servers or origin servers.
The original purpose of DNS was to make navigating the internet not only fast but also practical. Hence, one of the purposes of DNS servers (and essentially the whole DNS system) was to not require internet users to remember long IP addresses of different websites. Instead, because of DNS servers, internet users could simply type the name of the website for complete access.
How does DNS Work?
The work of any DNS server starts when an internet user types a website’s domain name into the URL bar of a web browser. The web browser needs to communicate with the network to help the user access the website, and the message sent by the browser to the network is known as a query.
All internet service providers (ISPs) assign a machine known as recursive resolvers to each internet user. When the user types an address, the device sends a query to the recursive resolver, which usually has the correct IP address (matching the user’s DNS query) stored in the cache. If the recursive resolver doesn’t have the matching IP address, the machine can look to other machines to recursively find the matching IP address.
This is where recursive resolvers start to contact DNS root name servers, which direct the recursive resolver towards the correct TLD name servers by properly analyzing the top-level domain.
Now, all TLD servers have a set of name servers. Once the recursive resolver asks the proper TLD server (referred to by the DNS root name server) for the matching IP address, the TLD servers point the recursive server towards another set of authoritative DNS servers. TLD servers do that by analyzing the second-level domain of the user’s DNS query.
The next step is for the recursive resolver (the one provided by the ISP to all customers) to query the authoritative DNS name server referred by the TLD servers for information on the correct IP address. As indicated earlier, all domain names are assigned a set of authoritative DNS name servers that essentially know everything about the domain names. This information includes the correct IP address matching the domain name the user requested by typing the name of the website or online service.
In any case, once the recursive resolver queries the right authoritative DNS name server, the recursive resolver extracts the proper A record from the authoritative DNS name server. This A record contains the relevant DNS records and appropriate IP address mappings, which are then stored by the recursive resolver via a local cache. If another user makes the same DNS query, the recursive resolver can quickly use the local cache to make a DNS response.
Now, the only step left is for the recursive resolver to send the information contained in the A record to the user’s device. Upon receiving the A record, the device reads the data and passes the correct IP address to the user’s web browser.
Finally, the web browser uses the IP address to establish a connection to the desired website. Though many steps are required for a DNS server to work properly, the entire process usually takes less than a tenth of a second.
How can I Find My DNS Server?
The process of finding the DNS server changes depending on the operating system the user’s device is currently using. For Windows users, the steps to find the DNS server are given below.
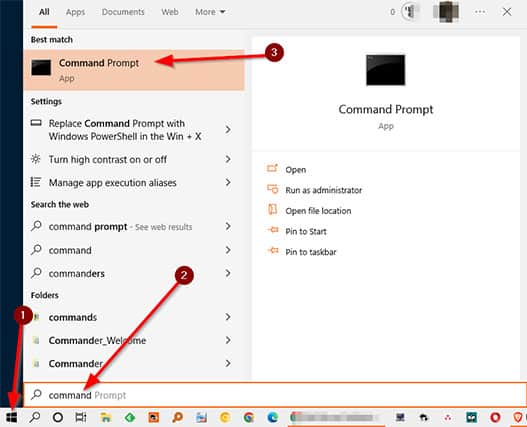
1. Open the Command Prompt by searching for “Command Prompt” via the Windows search bar or referring to the list of installed programs.
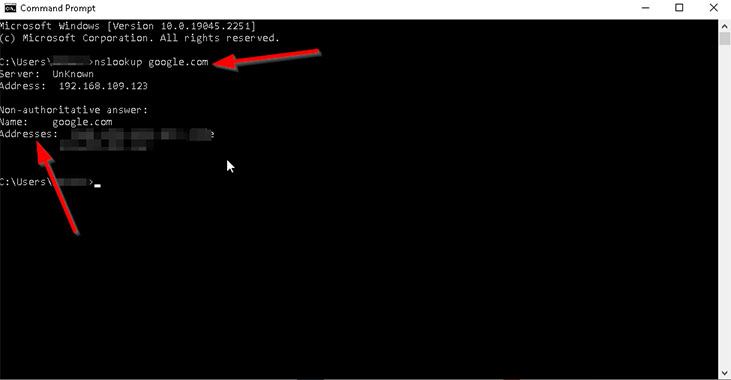
2. The Command Prompt should come in the form of a black screen. Type the command: nslookup google.com
3. Press “Enter.”
4. From the results, look for the line that begins with the word “Address.” This is the desired DNS server.
Note:
For Mac users, the steps on how to find a DNS server are essentially the same. The only difference is that Mac users have to open the Terminal app instead of the Command Prompt. Opening the Terminal is as easy as pressing the combination of the “Command” key and the space bar. From the window that opens, type “Terminal,” then press enter. Use the same command as before to know the DNS server address.Sometimes, there is a need to know the router’s DNS server address rather than that of the device. In that case, follow the steps given below.
- Launch a web browser.
- Find the IP address of the router (sometimes called “Default Gateway”).
- Input the router’s IP address into the URL bar on the web browser, then press “Enter.”
- From the router page, enter the required login credentials. Usually, the credentials can be found below the router or on the packet the router came in.
- Click on the “Status” option.
- Find the DNS address on the Status page.
For Linux users, the steps to find the DNS server address are given below.
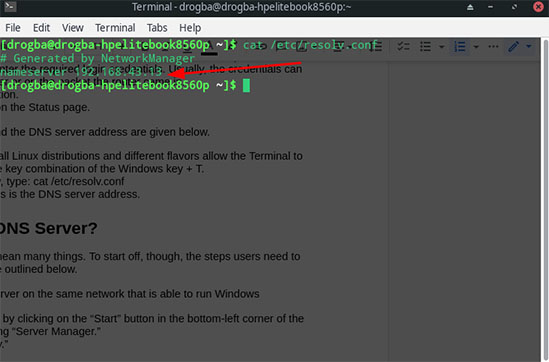
1. Open Terminal. Almost all Linux distributions and different flavors allow the Terminal to be opened with a simple key combination of the Windows key + T.
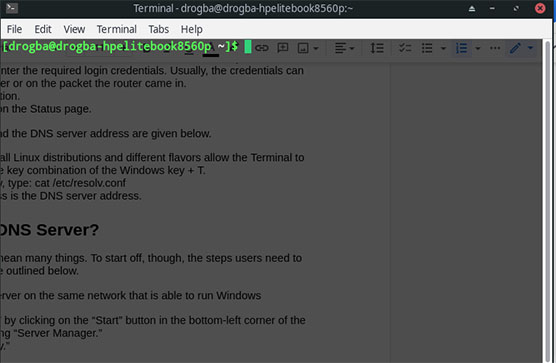
2. On the Terminal window, type: cat /etc/resolv.conf
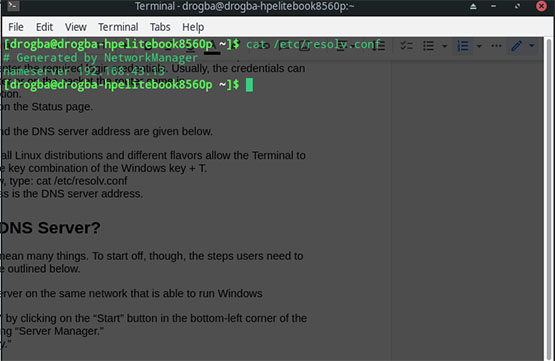
3. The nameserver address is the DNS server address.
How do I Set up a DNS Server?
Configuring DNS servers can mean many things. To start off, though, the steps users need to take to set up a DNS server are outlined below.
- Have a working DNS server on the same network that is able to run Windows Deployment Services.
- Open “Server Manager” by clicking on the “Start” button in the bottom-left corner of the screen and then selecting “Server Manager.”
- Click on “Role Summary.”
- Click on “Add Roles.”
- Click “Before You Begin.”
- Click “Next.”
- The screen should say “Confirm Installation Selections.” On that page, click the “Install” button.
- Now, the top of the screen should say DNS server. Click “Next.”
- Finally, the screen should say “Installation Results” at the top. Hit the “Close” button.
Setting up a DNS server on a Linux machine is also simple, as outlined in the steps below.
- Make sure there is a working Linux installation on the device that will be used to set up a DNS server.
- Install DNSmasq. This can be done on Debian-based systems by opening the terminal and typing the command “apt update” and then “apt install dnsmasq.”
- Now, type the command: sudo nano /etc/dnsmasq.conf
- The above command should open a file. Press the combination of Ctrl+W to find some lines of code and then uncomment those lines. The lines that need to be uncommented are “#domain-needed” and “#bogus-priv.” Uncommenting simply means removing the “#” from the beginning of these lines.
- Some new lines of code need to be added to the configuration file opened in the previous step. These lines are ”server=8.8.8.8” and “server=4.4.4.4”
- Next up, increasing the value of the cache size is a good idea. Find the line that says cache-size. Uncomment the line once found and then change the value to 1000 like so: cache-size=1000
- Map the hostnames to the appropriate IP addresses. Open the /etc/hosts folder and start adding routes near the bottom of the file (examples include “192.168.0.102 web-server” and “192.168.0.108 gateway.lan”).
- Save and then close the file.
- Restart Dnsmasq, which can be done with a simple command: sudo service dnsmasq restart
- Install dnsutils packages (if required) and use the commands “dig google.com @localhost” and “dig gateway.lan @localhost” for testing.
- Configuring the network so that dnsmasq is used for DNS lookups will require different steps depending on the make and model of the router equipment. Refer to the router manual to do that. But briefly, go to the router’s web interface (via the router IP address and a web browser) and go to the “Settings” page to find the DNS server option. Change the DNS server settings so that the router’s primary DNS server is the IP address of the server set up in the previous steps. Also, use a third-party DNS server as the secondary server for more reliable internet access.
If configuring DNS servers is taken to mean changing DNS server settings, then follow the steps given below.
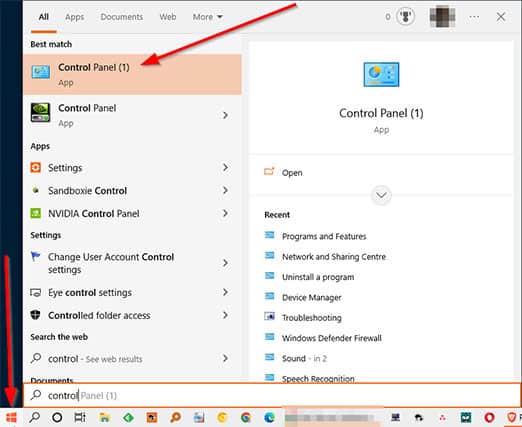
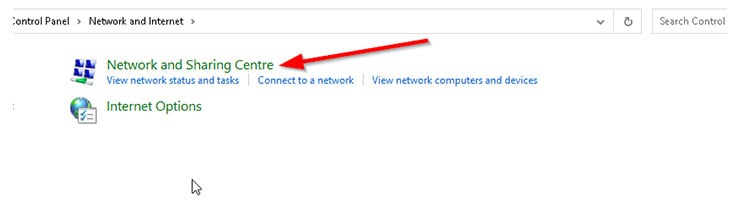
1. Open the Control Panel.
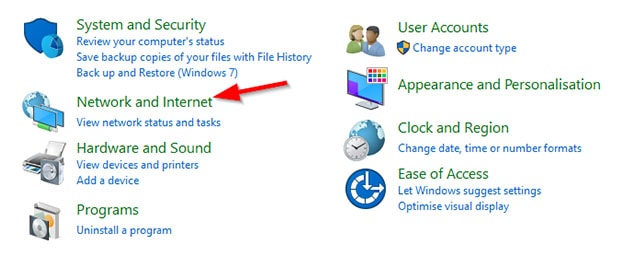
2. Open “Network and Internet.”
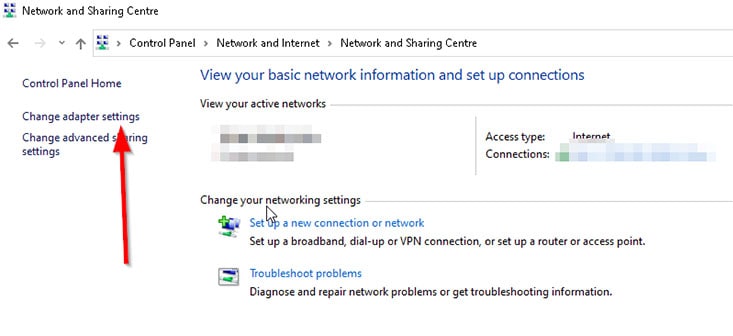
3. Click on “Network and Sharing Center.”
4. Click on “Change Adapter Settings.”
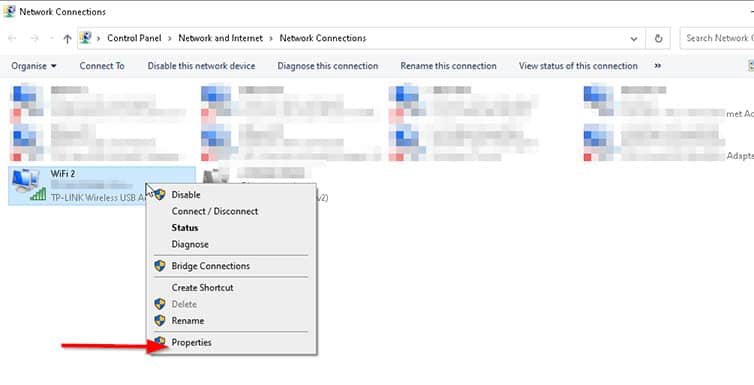
5. From the new screen, pick the connection for which the DNS server needs to be changed.
6. If the connection is an Ethernet connection, right-click on the Ethernet interface. Then, click on “Properties.”
7. For WiFi connections, pick the WiFi interface and then click on Properties.
8. From the next window, select the “Networking” tab.
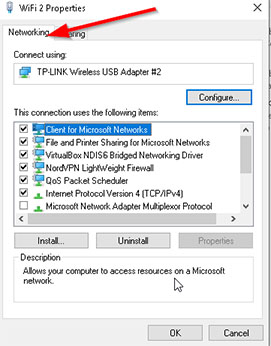
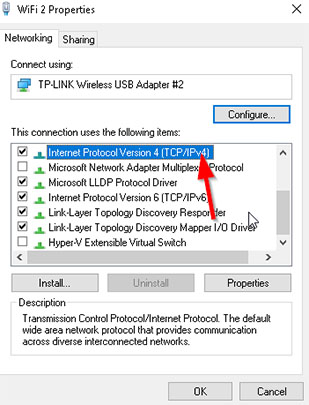
9. Look at the heading that says, “This connection uses the following items.”
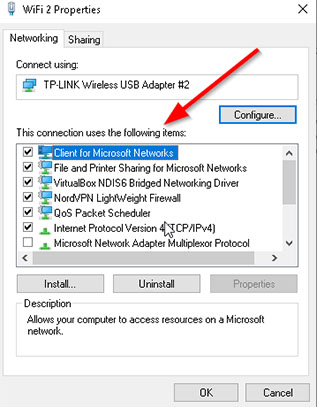
10. Either click on “Internet Protocol Version 6” or “Internet Protocol Version 4 (TCP/IPv4).”
11. Hit the “Advanced” button, and then click on DNS.
12. In the new tab, note all the information that needs to be changed.
13. Pick the option labeled, “Use the following DNS server addresses.”
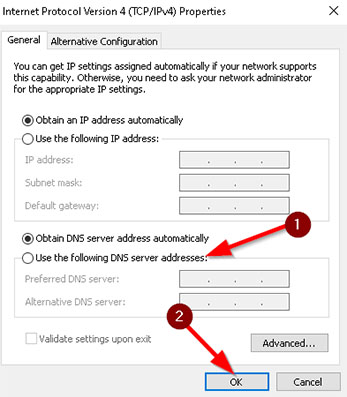
14. Input the information of the new DNS server.
A similar procedure can be followed for the Mac platform. The steps to learning how to find a DNS server are different for each platform but, ultimately, simple to follow.
What are the Types of DNS Servers?
The types of DNS servers are given below.
| Type of DNS Server | Description |
|---|---|
| DNS Resolver/Recursive Resolver | DNS resolver typically takes the DNS query from a web browser, resolves the query and returns the correct answer to the DNS query. |
| DNS Root Server | The DNS root server translates the web URLs (domain names humans can read) into IP addresses. |
| Authoritative DNS Server | The final server that helps load the requested webpage is the authoritative server, which usually has access to the IP address requested by the user’s DNS query. The authoritative server delivers the IP address to the DNS resolver. |
| TLD Nameserver | TLD name servers categorize websites based on the last part of the domain name, such as .net, .org or .com. |
1. DNS Resolver
A DNS resolver is simply an internet-connected server that can convert the desired domain names to IP addresses. DNS resolvers essentially perform the function of converting a website address like www.securitygladiators.com to the matching IP address, a set of numbers that helps the web browser take the user to the correct website.
Of course, the overall structure is much larger and the DNS resolver only performs a single action. In reality, the resolver usually takes the user’s DNS query and accesses other servers in the DNS to get the correct IP address. Only after that can the resolver get the correct response.
Now, depending on the user’s DNS query, the function of the DNS resolver can change. Typically, the resolver would start to search for the correct IP address in the resolver’s local cache. Other times, the DNS resolver might start the search from the local cache of the device’s operating system. If the DNS resolver can find the matching hostname, the DNS query is resolved quickly.
Note:
However, in many cases, the DNS resolver can’t find the correct IP address for a given domain name and must contact a DNS root server. The DNS root server then sends information about a TLD name server to the DNS resolver. The DNS resolver uses the TLD name server to get information on an authoritative name server, which usually has the IP address matching the DNS query.DNS resolvers form one of the four major parts that allow DNS to perform all necessary operations. DNS resolvers are sometimes referred to as recursive resolvers as well. There can be many different parties controlling or operating the DNS resolver, from the local network to the WiFi network, mobile carrier service or ISP.
2. DNS Root Server
The DNS has a hierarchical structure. And at the top of the hierarchy lies the DNS root server or DNS root name server. DNS root name servers are the first servers that a recursive resolver looks for when searching for DNS records.
In other words, contacting the DNS root server is the first thing a DNS resolver does when a user inputs a website’s name into the browser’s URL bar. Like DNS resolvers, DNS root servers are capable of responding to DNS queries, but only for records already stored or cached in the root zone. If a given DNS nameserver lacks the proper record, DNS requests can be referred to the concerned top-level domain servers (more on that below).
Every recursive solver knows 13 DNS root name servers. Each one’s main job is to take a given recursive resolver’s query and respond to the DNS query either on its own or by pointing to the correct TLD name server while taking into account the domain name extension, such as .net or .org or .me.
3. Authoritative DNS Server
If the DNS root server is the first stop on a recursive resolver’s mission to find an answer to the user’s DNS query, then the authoritative DNS server is the last stop. Once referred, the authoritative name servers can take inputs such as the subdomain and the domain name of the user’s DNS query. As usual, if the authoritative DNS server has the relevant records, the matching IP address is returned to the DNS resolver. If the authoritative DNS server does not have the information to resolve the DNS query, the recursive DNS resolver will be pointed to another name server with the DNS A record for a given subdomain.
Authoritative DNS servers can be considered as servers with authority over an assigned zone. For organizational purposes, the DNS is divided into different zones—a given DNS zone forms a small portion of the overall DNS namespace, and every DNS zone is managed by a different administrator or organization. Authoritative DNS servers can query and be queried by other name servers. These servers come in two variations: A master authoritative server and a secondary authoritative server. Each DNS zone can only have one master name server, but there can be multiple secondary name servers. Name servers can also switch roles between being a master or a secondary server.
Note:
As mentioned, the authoritative name server is the server that provides the answer to the user’s DNS query. Of course, the domain names and the related information must be installed in the configuration system for the authoritative name server to answer DNS queries successfully.4. TLD nameservers
Top-level domain (TLD) nameservers are responsible for keeping information for all domains that may share an extension. Examples include .net or .com or .org. The DNS recursive resolver queries a root name server, which then sends a response to the recursive resolve. The recursive resolver then queries the correct TLD name server pointed by the root name server. Afterward, the TLD name server sends a response to the DNS recursive resolver pointing towards the correct authoritative name server.
To understand TLD nameservers, readers should know how top-level domain works. As mentioned before, the DNS is divided into zones. A top-level domain represents the highest level of domain names that may be found in a root zone. Lower-level domain names usually end with a dot and a label, such as .com or .org or .me. That last label is known as TLD.
For example, a given TLD name server could be responsible for holding all the domain names and websites that end with .net. If a given internet user wanted to go to ipleak.net, for example, the recursive resolver would send a query to the root name server, which would then point the recursive resolver to the TLD name server that deals with .net domain names. The TLD name server would respond by referring to the correct authoritative name server.
For better organization, IANA has two groups of TLD servers: One is the generic top-level domains group, including TLDs such as .gov, .edu, .net, .org and .com. The other includes country code top-level domains such as .us, .jp, .ru or .uk.
What is a Private DNS?

DNS, or Domain Name System, is one of the essential components of what is known as the modern internet. DNS servers translate domain names to IP addresses. All internet service providers provide DNS server access, so users do not have to deal with any DNS configuration. However, there is a huge privacy risk in DNS servers resolving requests without adequate protection. Whenever the user inputs a URL into the URL bar of a web browser, the URL query (or even search queries) are sent in plain text. Hackers with enough skills can pick up on these signals to know what the user is doing.
Private DNS solves the problem of hackers snooping on users’ DNS requests. Private DNS usually means DNS over Hypertext Transfer Protocol Secure (HTTPS) or DNS over Transport Layer Security (TLS). Using Private DNS means all of the user’s DNS queries are encrypted. Consequently, hackers cannot eavesdrop on the user.
This is important:
Readers should also know that the DNS servers run by ISPs are usually public. A private DNS server gives users the opportunity to have more control over network access and available IP addresses.What are the Best DNS Servers?
For the average internet user, free DNS servers offer more than enough. However, paid DNS servers may make more sense in certain situations. In any case, the best DNS servers are given below.
- Google Cloud DNS (Best Overall): The biggest benefit of using Google Cloud DNS is better integration with other Google products. Additional benefits include affordable packages and an intuitive user interface with several customization options. As with any DNS service, Google Cloud DNS also has disadvantages, such as a lack of support and experience compared to other DNS services in the market.
- Cloudflare (Best for Security): Cloudflare is among the best premium DNS services, with impressive performance features, great privacy and complete support. Cloudflare is fast, keeps no record of user data and publishes public reports for more transparency. Cloudflare doesn’t block ads, though.
- Dyn (Best for Reliability): Dyn is an older DNS provider offering fast and effective customer support. Dyn DNS service has won many awards for good technical support, an easy-to-use interface and affordable subscription packages. The pricing structure may not be the most straightforward and support for small businesses may be lacking, but otherwise, one can’t go wrong with Dyn.
What are the Best Free DNS Servers?
The best free DNS servers are given below.
- Google Public DNS (Best Overall): The Google Public DNS server is currently the king of free DNS servers. Internet users can expect a fast browsing experience, low redirects, accurate results and enhanced security. Google Public DNS offers servers for both IPv4 and IPv6. Google has data centers worldwide, leveraging the network to offer better speeds and performance.
- Quad9 (Best for Security): Quad9 is not as popular as other established public DNS services, such as Google Public DNS or OpenDNS, but the service is top-notch. Quad9’s features include enhanced protection, automatic blocking of malicious sites and zero logs. Quad9 doesn’t have content filters and offers an unsecured version of the main IPv4 public DNS. Like Google Public DNS, Quad9 supports DNS over HTTPS.
- Control D (Best for Variety): Control D is a public DNS service offering multiple DNS servers, each catering to a different category of users. The uncensored resolver proxy allows users to access some blocked websites. Other servers on offers can block ads, trackers, malicious websites, adult content and social media websites. The unfiltered server only offers enhanced security and privacy and is the most popular choice among Control D customers. Control D has support for both DNS over TLS and DNS over HTTPS.
What are the Best DNS Servers for Gaming?
The best DNS servers for gaming are given below.

- Google Public DNS (Best Overall): Without a doubt, the Google Public DNS is the best for most online activities, including gaming. Since Google Public DNS offers low ping times, enhanced privacy and security, and a faster browsing experience, the service is perfect for gamers. Gamers need low latency, a quick response and stable performance. Google Public DNS offers all three while protecting gamers against DoS attacks and cache poisoning.
- Cisco Umbrella (Best for Customization): Modern gamers not only want reliable performance and security but also customization options. Cisco Umbrella (formerly known as OpenDNS) is the perfect DNS server for users wanting the most amount of control. Cisco Umbrella supports multiple DNS servers and setup options according to one’s preferences. Other advantages include two subscription packages for even more features and support for advanced security features. However, one disadvantage is that Cisco Umbrella might be overwhelming for beginner users.
- AdGuard DNS (Best for Blocking Ads): With a proven track record of keeping users safe from malicious ads, gamers can’t go wrong with AdGuard DNS. AdGuard DNS isn’t just a secure DNS; the service can also block trackers and domains known for malicious content. Other advantages of AdGuard DNS include easy and quick setup, setup guides available on the official website, 300,000 queries for free and just two IP addresses. AdGuard DNS is not in the top two because the service stops blocking features after the first 300,000 queries. The free plan supports only five devices.
- NextDNS (Honorable Mention): NextDNS does not have the same following as Google Public DNS or Cloudflare, but this DNS service’s advantages are hard to ignore. NextDNS comes with extra control features such as website restrictions, parental controls, website category blocks and apps. The setup is as easy as any other DNS service, and guides are available for all platforms. Like AdGuard, NextDNS offers 300,000 queries per month for free. NextDNS supports DNS over TLS, DNS over HTTPS and DNSCrypt. Some of the disadvantages of NextDNS are the freemium model, a lack of independent audit reports and a privacy policy that could use some improvement.
What is the Difference Between Recursive DNS and Authoritative DNS?
Recursive DNS and authoritative DNS servers are two types of servers that perform different functions. In simple terms, authoritative DNS servers act like a company that publishes multiple phone books catering to different regions. On the other hand, recursive DNS servers are most like a person who needs to look up a number. To complete the lookup, the person (in this case, the recursive DNS server) has to consult a phone book.
Let’s examine the differences between recursive DNS vs. authoritative DNS in more technical terms: Recursive DNS servers start working as soon as the user inputs a website address into the URL bar. This type of DNS server needs to find out which IP address matches the website domain name the user just typed. Authoritative DNS servers hold the phone book (from the previous example) or the record, which matches the domain name with the correct IP address.
Recursive DNS servers usually ask questions to other types of DNS servers, while authoritative DNS servers answer those questions. There are thousands of recursive DNS servers, while there are only a handful of authoritative DNS servers—each covering a specific region.
In many ways, authoritative DNS servers are holders of information such as IP addresses and the associated domain names, while recursive servers are explorers that discover information for the end user.
