For the end user (that is, all online users with internet-enabled devices), a VPN is a tool that is used to hide sensitive information, such as full name, IP address, location and web browser history. Depending on the type of activities the user performs via the internet, a VPN may also help hide medical records, financial information and credit/debit card details.
The steps users need to take to use a VPN are given below.
- Start Your VPN Software
- Log in With Your Account
- Read the Terms of Service
- Select the Required Protocol Based on Needs
- Make Sure the Option To Stop All Internet Traffic if the VPN Disconnects Unexpectedly (Kill Switch) Is On
- Make Sure IPv6 Leak Protection Is On
- Select the Server Needed
- Connect
- Test for VPN Leaks
- Disconnect When Done
Whether the requirement to use a VPN is for personal reasons or work, learning how to use a VPN as a beginner can go a long way in protecting online privacy.
Table of Contents
1. Start Your VPN Software
To start the VPN software, the device must have the appropriate VPN app. The VPN app can be downloaded from the official website of the selected VPN. Most VPNs require the purchase of a subscription package before the VPN app can be downloaded. To sign up for a subscription package, go to the official website of the selected VPN and pick one subscription package that suits the most needs. The vast majority of VPN services offer three to four subscription packages. The longer the subscription package, the more discount the VPN offers. After signing up for a subscription package, users may have to create an account, though most times an account is created as soon as payment details are provided. Download the right VPN app for your operating system from the download area and install the VPN app. Android and iOS install the VPN automatically after downloading while Windows users have to double click the .exe file downloaded from the official website to start the installation process. Then, users can launch the VPN app.

Once the VPN app is launched by either clicking the VPN app icon on the desktop or searching via the installed apps section, the main screen should show the name of the VPN and two input fields. One is for the password and the other is for the associated username or email address.
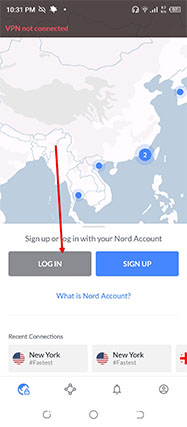
2. Log in With Your Account
The login details should be easy to find either via a welcome email or during the payment process. Some VPNs require the user to create login details during the registration process. Others allow the user to complete the registration process without creating login details. The login details are, in that case, sent to the email address the user registered with.
A few elite VPNs not only require the correct username and password combination but also require the user to provide a passcode sent to the email address registered with the VPN service.
3. Read the Terms of Service
For first-time users, some VPN apps require a click on the Agree button on a page that shows the complete terms of service. Beginner users do not need to read the terms of service document from top to bottom. Usually, only a tick is required besides the checkbox that says “I have read the terms of service.”
Almost all software applications (not just VPNs) require users to agree to some terms of service documents. Developers and distributors do that to let the user know about any restrictions on the use of the app. The rest is just legal jargon designed to protect the user and the company developing and distributing the software. In the case of VPNs, the only parts relevant to end users are where the VPN mentions to not use the VPN app for illegal activities.
4. Select the Required Protocol Based on Needs
Selecting the right protocol based on the activity that will be performed after the VPN connection is important. VPNs can change speed, functionality and level of security based on the VPN protocol used. The most common VPN protocols are OpenVPN, IPSec/IKEv2, SSTP, WireGuard, L2TP/IPSec and PPTP. OpenVPN is considered the best VPN protocol for most users. WireGuard is fast becoming the strongest VPN protocol for all types of users. For streamers, WireGuard is perhaps the best option.
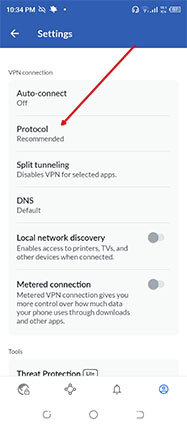
Most VPN apps come with a Settings page which should be accessible via the main screen. A common symbol used to access the Settings menu is a cog or gear icon usually located in the bottom or top left-right of the screen. After accessing the Settings menu, look for VPN protocols. Some VPNs use the term “Connection Type.” Clicking the right option should open a context menu with all the available VPN protocols. Choose WireGuard or OpenVPN.
5. Make Sure the Option To Stop All Internet Traffic if the VPN Disconnects Unexpectedly (Kill Switch) Is On
The kill switch feature essentially protects the user’s data and sensitive information moving through the internet when there is a VPN connection drop. A kill switch cuts off all internet access to the device, which results in DNS and IP leak protection. Almost all good VPNs have the kill switch option available on major platforms, such as Android and Windows. Some kill switch features offer further functionality where the apps to kill can be selected and vice versa.
To enable the kill switch feature, (assuming the VPN app has already been launched), go to the Settings menu by clicking the gear icon near the edges of the VPN app. Sometimes, the Settings menu is simply presented as Settings on the main VPN app page.
Go to the General Tab. From there, the option “Kill Switch” or “App Kill Switch” should be visible. Enabling the kill switch may result in the VPN app popping up another notification explaining the kill switch feature.
6. Make Sure IPv6 Leak Protection Is On
IPv6 is the newest protocol that modern devices have started to support to make up for the deficiencies of IPv4. A lot of users disable IPv6 if the device only needs IPv4. But disabling IPv6 can cause other connectivity issues.
Similar to most of the applications in the market today, most VPNs only support IPv4. Some VPNs offer a feature, as a button to disable IPv6 automatically without any configuration requirements. Keep in mind that disabling IPv6 is different from using a VPN to disable IPv6. By disabling IPv6 via the VPN app, only the user’s IPv4 traffic would get encrypted and passed through the encrypted tunnel. IPv6 interfaces would be disabled and that will protect any IP address leaks.
To make sure IPv6 leak protection is on, go to the Settings menu of the VPN app and look for the Ipv6 leak protection option. Make sure the option is set to “ON.” A few elite VPNs like NordVPN offer IPv6 leak protection automatically when users connect to a server with the OpenVPN protocol. For mobile users, the IKEv2/IPSec protocol automatically allows the NordVPN app to enable IPv6 leak protection.
7. Select the Server Needed
Connect to a suitable server from the list of servers shown on the main menu. Some VPNs hide the server list in a left or right-sided panel that users have to click to open. Then, open the servers page to finally look at the complete list of servers. Other good VPNs show a map on the main page of the app that can be navigated to the desired VPN server location.
A VPN server located near the actual physical location of the user offers less anonymity but more speed. That’s because the data has to travel less distance over the internet to finally get to the VPN server, then to the final destination and then back to the VPN server to finally arrive at the user’s device with the required response. VPN servers far away from the actual physical location of the user offer more anonymity at the cost of a slight speed reduction. Another benefit of connecting to servers far away in countries like the U.S. and the U.K. is access to in-demand blocked streaming services such as BBC iPlayer, Sling TV, Disney+, U.S. Netflix and Amazon Prime Video.
To connect to a server simply pick a server and hit the connect button, which is usually prominently visible on the VPN app’s main page. The VPN app may automatically connect to the server once a server is picked, saving the user an extra click.
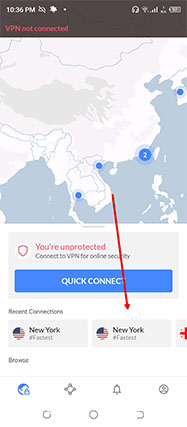
8. Connect
The connecting part is the simplest step of all the steps. Most VPNs have a big, colorful and fairly noticeable button (usually in the middle of the page) that says “Connect.” Sometimes, the connect button comes in the form of a power symbol. The connect button or the power symbol usually changes color from red or yellow to green upon a successful VPN connection.
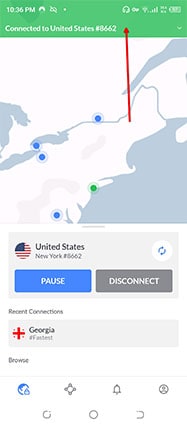
To complete this step, simply click the connect button.
9. Test for VPN Leaks
All VPNs claim to protect data. But a lot don’t. Testing for VPN leaks is a great way to check if a VPN is working. The first item a VPN should never leak is the user’s IP address. To check IP addresses, simply go to a search engine and type “What is my IP address.” Plenty of third-party websites show IP addresses as well.
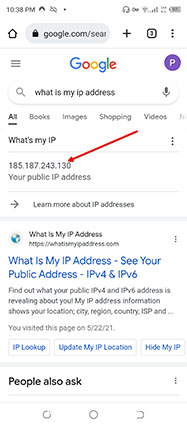
Now, for the VPN leak test to work, the VPN app should be used to disconnect from the server. Then, check for the current IP address. Note down the IP address. Go to the VPN app and connect to any desired server. Then go back and check the IP address again. Note down the new IP address. If the two IP addresses match, then the VPN is probably not working.
Another way to check for VPN leaks is to go to Google and input the new IP address like this “IP 182.14.231.8.” Check to see if the IP address is linked to the user’s real city instead of the new one that should have appeared because of the new IP address. If the city matches the original city of the user then the VPN is leaking.
VPNs also protect against internet service providers that track users via DNS queries and DNS responses. Modern elite VPN services have dedicated DNS services as well that can protect devices against DNS leaks. To test for DNS leaks, use any of the many third-party services available, such as dnsleak.com or ipleak.net. Such websites show the name of the service controlling the DNS server. If the DNS server is controlled by the actual internet service provider of the user then the VPN in question is causing DNS leaks.
Pro Tip:
The easiest way to fix any of the leaks mentioned above is to change the VPN service to another that provides adequate protection.10. Disconnect When Done
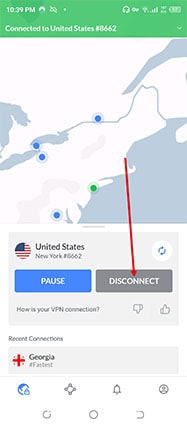
After checking for VPN IP and DNS leaks, connect to a suitable server again by launching the VPN app, selecting a server and hitting the connect button.
VPNs provide great protection from all kinds of snooping and some types of cyber threats. In combination with an antivirus product, users can benefit from a complete security system that covers all bases. After turning on the VPN, use a secure browser to complete any task that may require sensitive information to be transferred. Such sensitive information is commonly found in activities such as banking, checking health records and looking at credit scores and insurance policies. Other activities with less sensitive information include accessing websites that have been blocked and streaming content not available for a particular reason.
Once the task is finished, bring up the VPN app again, click the connect button again to disconnect from the VPN server and return to normal internet usage.
What Is a VPN?
A VPN is a tool that enhances privacy and secures online activities, such as conference calls, bill payments, shopping, gaming, streaming videos and checking medical and financial records. Modern VPNs come in the form of VPN apps that users download to devices that need protection.
How Do I Get a VPN?
To get a VPN, go to the official website of the desired VPN company, sign up for a subscription package, download the relevant VPN app for the desired platform (most elite VPNs support Windows, Android, iOS, and macOS), install the VPN app, and finally launch the VPN app.
The steps users need to take to learn how to install a VPN for the Windows platform are given below.

- Purchase a subscription package for the VPN in question by going to the official website of the said VPN.
- Register for an account. That can be easily done by clicking the sign-up button, providing payment details and picking a package.
- Go to the Downloads area and download the VPN app for the device that needs protection. In the case of Windows, download the .exe file.
- Make way to the default Downloads folder.
- Locate the downloaded .exe file.
- Double-click the .exe file.
- Go through the installation wizard. Clicking the “yes” button until the finish button appears is a safe option for most users. For advanced users, there may be a need to change the directory in which the VPN is installed.
- Launch the app and then input the correct login credentials to move forward. As mentioned before, the login credentials are created during the registration process or emailed to the user.
- Some VPNs require additional pieces of information to log in, such as two-factor authentication or a security code. If that is the case, then go to the registered email address’s inbox and check for a security code. Input that as well in the proper input field.
- Go to the main page of the app and connect to a suitable server.
The steps to follow to get a VPN manually on the Windows platform are given below.
- Go to the official website of the desired VPN and purchase a package. Then, from the VPN’s official website, note down VPN protocol information and the related VPN address. Most VPN websites have such information available in the Setup Guides section.
- Click the Windows logo icon in the bottom-left corner of the screen.
- Hit the “Settings” option.
- Click on the option “Network and Internet.”
- Go to “VPN.”
- Select “Add a VPN.”
- Locate the VPN provider and choose the option “Windows.”
- Input the name of the VPN in the Connection name box.
- Enter the VPN address noted earlier in the Server name and/or address. The VPN address should give the information of the VPN server that will be used for the VPN connection later.
- Go to “VPN type” and choose a VPN protocol. Most of the time, the VPN protocol used for manual configuration will be OpenVPN. But the protocol can change depending on the VPN service.
- Provide sign-in information. As mentioned before, the sign-in information mostly comes as a username and password. Some VPNs may require authentication certificates for manual setup. These certificates are also available on the VPN’s official website.
- Save all the settings.
- Pick the newly created VPN option and go to “Advanced Settings/Options” for more configuration items, such as proxy or encryption type.
- Look at the Windows taskbar (in the lower right corner of the screen) and click the icon for “Network” (which usually shows whether the device has an internet connection).
- From the menu that opens, pick the newly created VPN.
- Hit the “Connect” button.
- The VPN may ask for sign-in information one more time for proper authentication.
The steps users need to complete to get a VPN on macOS are given below.

- In the top left corner of the screen, click the menu icon in the shape of an apple.
- Then go to “System Preferences.”
- Go to “Network.”
- Hit “Action.”
- Click the option “Import Configuration.”
- Pick the appropriate file to then finally click “Import.” Users can get the VPN settings file for macOS from the official website of the VPN in question.
For users who do not have the VPN settings file, the steps are given below.
- Go to the menu by clicking the menu button in the top-left corner of the screen.
- Hit “System Preferences.”
- Then “Network.”
- And then “Add.”
- After that, click “Interface.”
- And then “VPN.”
- From the new window, click the option “VPN Type.”
- Choose a protocol. The VPN service should mention the protocol to be chosen on the official website. Most of the time, the protocol is IKEv2 but other options include IPSec and L2TP.
- Input the VPN’s name.
- Click the “Create” button.
- Input server address along with the account name.
- Go to “Authentication Settings.”
- Input the required authentication information. Most of the time, the authentication information is the same as the one created during the registration process (while purchasing a subscription package from the VPN’s official website).
- Go to the “Advanced” section to further customize the VPN setup. Most beginner users do not need to go to this section.
- Hit the “Apply” button and then “OK.”
The steps to learning how to install a VPN for iOS are given below.
- Go to the App Store.
- Search for the preferred VPN app.
- Click the appropriate option and then click “Get.”
- After the installation, purchase a subscription as soon as the setup shows the relevant prompts.
- Launch the VPN app.
To learn how to install a VPN for iOS the manual way, follow the steps given below.
- Go to Settings (the Settings icon on iOS comes in the shape of a gear).
- Go to “General.”
- Then add a VPN configuration.
- Depending on the VPN service, choose either L2TP or IPSec or, even better, IKEv2.
- Input VPN details as required by the on-screen input fields.
- If required, get the VPN certificates from the official VPN website. Sometimes VPN services send such certificates in welcome emails.
- To enable VPN protection go to the Settings menu at any time and click on the slider button for VPN so that the button’s value says “ON.”
Android users can follow the set of steps below.
- First, go to Google Play Store.
- Searching for the desired VPN.
- Click the appropriate VPN that appears in the search results.
- Hit the “Install” button.
- Launch the VPN app.
- Input the login details to finally connect to the desired VPN server.
The steps for the manual Android method are given below.
- Go to “Settings.” As in the case of iOS, the Android Settings icon comes in the shape of a gear, assuming the user has not changed the default icon theme.
- Go to “Network and Internet.”
- Click on “Advanced.”
- Select “VPN.”
- Click on “Add.”
- Input all the required information. Usually, the information required is a username, password, server address, VPN type and the name of the VPN.
- Click “Save.”
- Exit the screen.
- Go to “Settings” again.
- Click on “Network And Internet.”
- Click on “Advanced.”
- Click “VPN.”
- Select the name of the VPN that appears on the list.
- Input login details.
- Click “Connect.”
When To Use a VPN?
Any situation that requires privacy warrants the use of a VPN. More specifically, a VPN should be used when the user starts to face too many blocked websites or even few but important websites or services. If a task requires extra security, then a VPN should be used as well. Many websites block users when the IP address connected to the user’s device performs certain actions (such as taking screenshots and downloading files) too many times. In such cases, hiding one’s IP address with the use of a VPN is the only option to proceed.
This is important:
Almost all modern devices do have mechanisms to protect user privacy. But users who want to add an extra layer of privacy on a device or an operating system should definitely use a VPN. With a VPN, the user can feel confident that activities such as internet browsing, file downloading and streaming would not result in someone stealing private data.Another situation where users should use a VPN service is during remote work. Remote work means the user will have to access company assets and services from a distant location. A VPN will safeguard all the data that is communicated during a work session. Remote work may also involve managing confidential information and documents. A VPN can protect all that data from anyone making attempts for an interception.
Sometimes, a company’s assets may not be available in a particular country. Other times, a person working as a journalist in a country like China or Iran may need to work in a secure environment and then may also need a secure connection to stop any snooping and potentially harmful consequences.
Warning:
Public Wi-Fi networks such as those found in cafes, coffee shops, libraries and at the airports are not secure. A device’s IP address can be easily exposed without proper protection. With the IP address in hand, hackers can steal any data that the user tries to transmit or receive while on the compromised connection.A VPN should be used whenever there is a need to access the internet while traveling. Whether the traveling part is for business or vacation, a VPN can anonymize data in all circumstances.
So why should you use a VPN? There are many other reasons to use a VPN, such as saving hundreds of dollars on plane tickets by buying from a location with lower airfare, keeping activities such as torrenting safe and anonymous (as all activities would be linked to the IP address of the VPN server rather than the user’s device), accessing blocked content on sites like U.S. Netflix and Amazon Prime Video and preventing DNS leaks, IP leaks and WebRTC leaks.
What Is the Best VPN for Beginners?
The best VPN services for beginners are given below.
- (Best overall): NordVPN is a VPN that has got everything a beginner user could require for added protection and privacy. NordVPN offers the most advanced security features (double VPN, kill switch, obfuscated VPN and auto-connect), is reliable at unblocking sites like U.S. Netflix, offers the strongest protocols including the proprietary NordLynx, has huge discounts on longer subscription packages and has money-back guarantee. Compared to other elite VPNs, the only downside of using NordVPN is the six simultaneous connections per account restriction.
- (Best for Budget users): Surfshark offers the best value for money while offering more features than probably any other VPN. That is especially true for users who sign up for the several add-ons on offer. Surfshark offers the deepest discounts out of all the top VPNs, has a smooth user interface excellent for beginner VPN users and unblocks more streaming services than any other VPN. Surfshark also allows an unlimited number of connections per account and has a 30-day money-back guarantee. The only reasons to not use Surfshark would be slightly slower performance when using OpenVPN connections, frequent Captcha requests from Google when connected to Surfshark servers and below-par performance on Android.
- (Best for Speed): Beginner VPN users often go with VPNs that offer the most speed. While that may not be the best strategy long term, ExpressVPN offers blazing speeds with a not so good security department. ExpressVPN supports five simultaneous connections per account, offers AES 256-bit encryption for all connections, has a proprietary protocol by the name of Lightway, offers sleek apps including comprehensive support for routers and has invested heavily in infrastructure to provide a fast server network. The only downsides of using ExpressVPN are the lack of huge discounts even on longer packages and missing features, especially when compared to the rest of the elite VPNs on this list.
How To Select the Best VPN To Use?
The best VPN in any situation will depend on the user’s requirements. The best VPN for gaming will be different from the best VPN for security or gaming.
How to select the best VPN for gaming is below.
- Ensure the VPN has lots of servers in lots of locations. A lot of VPNs do not manage the right balance between locations and the number of servers. Some offer too many servers in too few places while others offer lots of locations with few servers. Both situations are bad for gamers. Gamers need a server close by at all times to reduce ping times for smoother gameplay. Gamers also need the VPN to have lots of servers, so there is always a free or less stressed server available. A server with low usage is better for reducing any lag and buffering issues.
- The best VPN for gaming will have many security tools. Gamers are often targeted by hackers via DDoS and botnet attacks. Without a VPN, gamers are also vulnerable to man-in-the-middle and fishing attacks. To guard against that, a VPN for gaming must offer AES 256-bit encryption along with a kill switch and auto-connect to remove the possibility of the gamer ever being online without VPN protection.
- A good VPN for gaming will offer huge discounts. Most gamers play video games for years, if not forever. Hence, a VPN with good discounts on long-term packages is better for gamers.
How to select the best VPN for streaming is below.
- The best VPN for streaming will have the greatest number of servers in high-demand locations, such as the U.S. and the U.K. All popular streaming services such as Netflix, Amazon Prime Video, Sling TV, Hulu, Disney+, HBO Max and BBC iPlayer work best when users are in the U.K. or in the U.S. Having more servers in the U.K. and the U.S. will offer two main benefits. First, the user will not face buffering issues because of the lack of overloaded servers. Second, if one server does not work, the user will be able to switch to another. Having lots of servers also guards against IP bans on part of streaming services.
- Another important feature to look at while selecting the best VPN for streaming is platform support. If a VPN does not have a dedicated app for Windows, macOS, Android and/or iOS, users won’t have much use of the service. Most streaming takes place on mobile devices running the Android operating system. Hence, users should make sure the VPN in question supports Android with a dedicated app.
- A good VPN for streaming will have no bandwidth limits and a generous money-back guarantee. Streaming consumes a lot of data. Hence, users must go for VPNs that do not have any data usage or bandwidth caps. A lengthy money-back guarantee will ensure that if a VPN does not work with a particular streaming service, the user can ask for a refund and look for another VPN that works with consistency.
How to select the best VPN for torrenting?
- For torrenting the most important feature of a VPN is security. Torrenting is frowned upon by most governments and internet service providers. Hence, users need a VPN that is strict on anonymizing user traffic via encryption and other security tools. A good VPN for torrenting must-have features like AES encryption, zero-logs, kill switch, auto-connect and fast protocols.
- A good torrenting VPN will also have lots of servers and no bandwidth limits. Similar to streaming, torrenting consumes a lot of data. Users should go with VPNs with unlimited bandwidth and no data caps for maximum download rates. A large number of servers will ensure the user can download large torrent files at maximum speeds to minimize download time.
- A good torrenting VPN must be located in a privacy-friendly jurisdiction. VPNs that operate from regions such as Romania, the British Virgin Islands and Panama have better control over user data and can keep the data safe from authorities. Apart from the above features, torrent users may also want to make sure that the VPN supports P2P on all servers and has independent audits to confirm any zero-log claims.
How Does a VPN Protect My Privacy?
Almost all applications, services, websites, social media platforms and plenty of advertising companies try to track users. Marketing companies want to know what the user is doing at all times. That’s how advertisement companies serve ‘relevant’ ads. What VPNs do is block all the ways to track users. Most tracking is done via IP addresses and locations. A VPN can hide the location from ISPs and advertisers. All users have to do is connect to a server in a different country. Once done, even the ISP can’t know the local connection’s IP address. And since advertisers use the location of the user along with the history connected to the user’s IP address, a VPN interferes with that process. The user’s activity would no longer be tied to the user’s IP address. Instead, the activity will be tied to the IP address of the server each time the user connects to the VPN. This way, the user’s privacy will be maintained.
In another case, VPNs can help stop tracking and monitoring of companies’ employees by hackers and corporate spies who want to steal sensitive product information and company assets.
Note:
Websites and services also use cookies to track users and create personally identifiable information profiles via location tracking. Since VPNs encrypt user data and change the user’s location, ISPs and advertising companies can’t create those profiles.Can I use a VPN on any device?
Yes, a VPN can be used on any device. But the user first has to make sure that the desired VPN allows multiple connections per account and has dedicated apps for platforms such as iOS, Android, Linux, Windows and macOS.
Modern elite VPNs are flexible enough to connect over 10 devices per account. Most also support all major platforms. Some even support routers, which is very important. If the user can install a VPN on the router (some elite VPNs have dedicated apps for routers while others offer in-depth tutorials on official websites) then the user can protect any device and as many devices as long as each individual device is connected to the same network.
