In this guide, we’ll show you how to create an account and send/receive encrypted emails through the service.
We’ll also cover some privacy best practices you can use to keep your email completely secure.
Table of Contents
How To Create a Mailfence Account
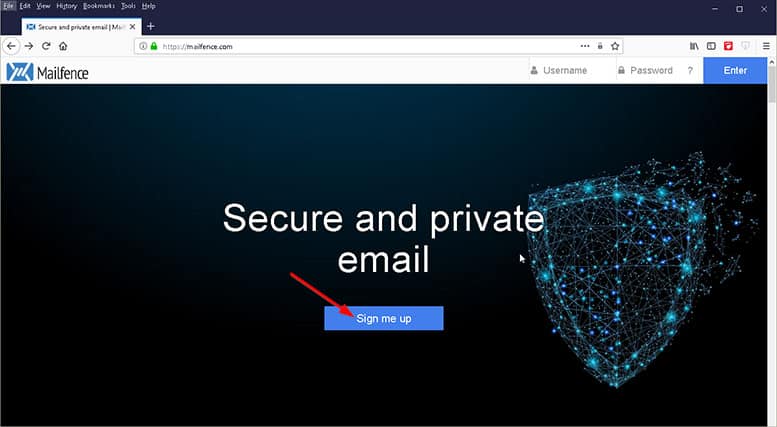
1. To create an account on Mailfence, you just have to go to the service’s official website and then click the button that says Sign Me Up.
2. A new screen will require you to provide some personal details such as First Name, Last Name, Email Address, Username, and Password.
3. After filling out these boxes, click the I Register button.

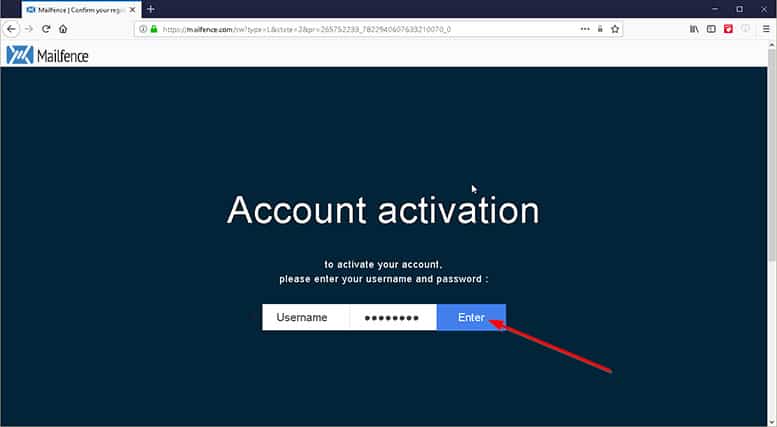
4. Now, check your inbox and click the confirmation email to go to another Mailfence page and click Enter. Now you should have access to your Mailfence email account.
You always have the option of using a burner email to sign up for a free account, but do take note that Mailfence will use your email to contact you for future updates or to address technical issues you might encounter while using the service.
In the next section, we will take a look at how to set up your Mailfence account so you can send and receive encrypted email messages with ease.
How To Set Up Your Mailfence Account
In this section, we will cover how to set up your Mailfence account correctly.
When you log in to your free Mailfence account, the first thing you should do is select an email address. In the beginning, you won’t have a lot of options here, but if you pay for one of the premium plans, you can have a custom domain name.
Once you have that done, you’re free to use Mailfence to send and /receive messages as much as you like. But before doing that, it’s a good idea to set up the encryption keys you’ll need to secure your messages.
This is important:
Do keep in mind that you have to create these encryption keys BEFORE sending your messages.So, here are the steps you need to take.
1. Go to the Mailfence website and sign in.
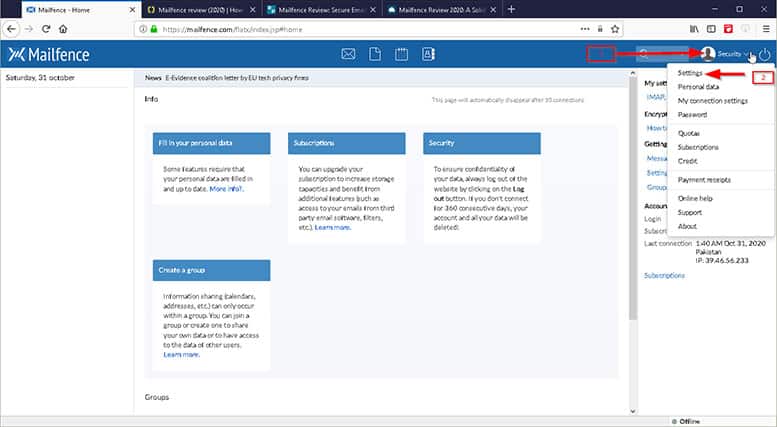
2. Click on the profile icon that appears in the upper-right region of the screen. This should open up another side menu, from which you need to click on Settings.
3. From the new screen, look at the left-side menu. Under the Messages heading, there’s an option labeled Encryption. Click it.
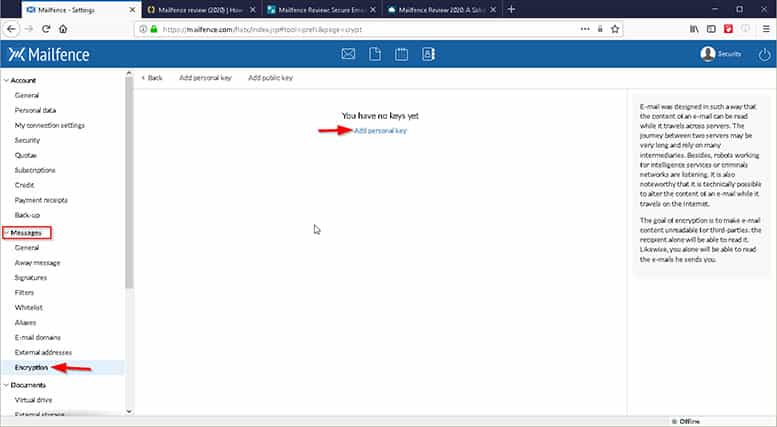
4. Then, click on Generate a new personal key. (If you already have a personal key and just want to import one, click on the button that says Import a Key to do that.)
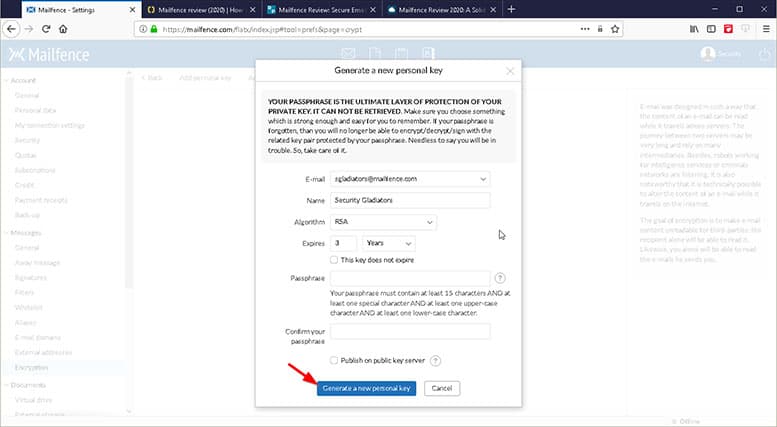
Mailfence will take you through the whole process of creating encryption keys via a wizard. When this process is complete, you will have created your keys, shared them and used them in your messages.
Note:
Keep in mind that unlike some of the other secure email services, Mailfence does not automatically encrypt messages. You’ll have to follow the steps above to generate encryption keys to send/receive encrypted messages with other OpenPGP services.How To Send and Receive Emails
The task of sending and receiving email messages is very simple, as is the case with the vast majority of email service providers.
1. To get started, click on the icon in the shape of a letter in the top centered menu. From the new screen, click on the button that says New, which should open up a message space.
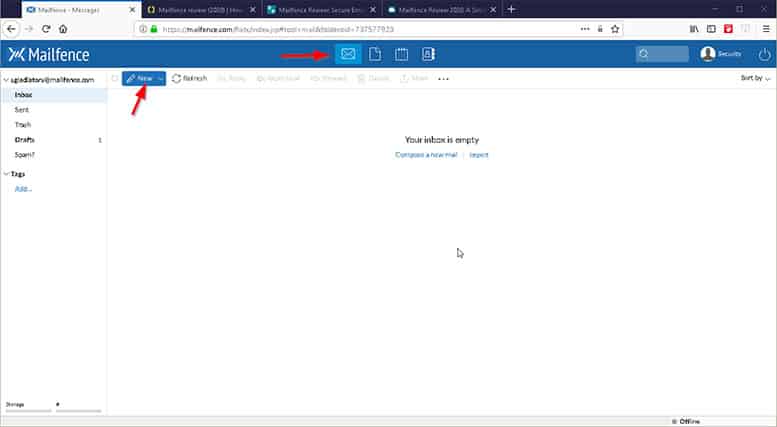
Here, you are free to create messages either in plain text or make use of Rich Text Formatting by clicking on the More option.
2. Once you have written your message, simply click the send button to send the message to your receiver.
The process is even simpler when you have to receive email messages, as it works the same way as any other email service.
How To Send and Receive Encrypted Emails
Sending encrypted email messages is just like sending normal email messages with the exception of a few steps.
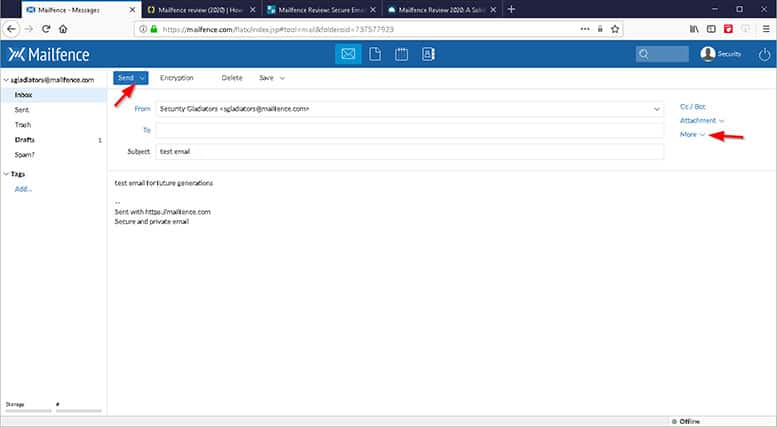
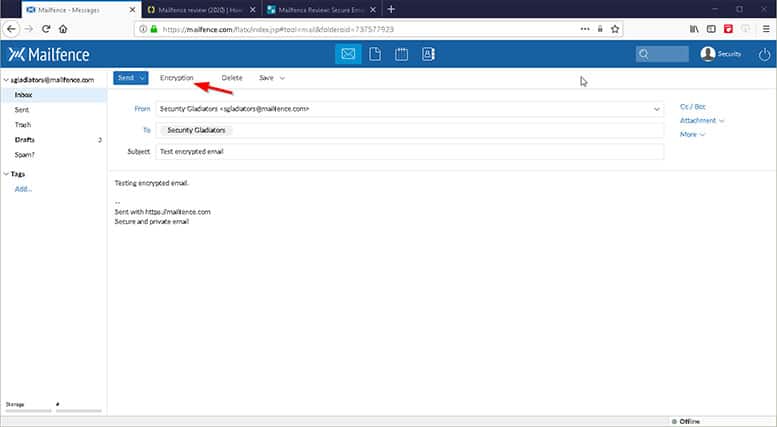
1. After clicking the Letter icon in the center of your main Mailfence screen and clicking new, and composing your message, Mailfence will give you the option to either send the message as it is or encrypt it. It will also give you the option to sign the message digitally for even more security. You need to click the button that says Encryption right beside the Send button, then press the Send button.
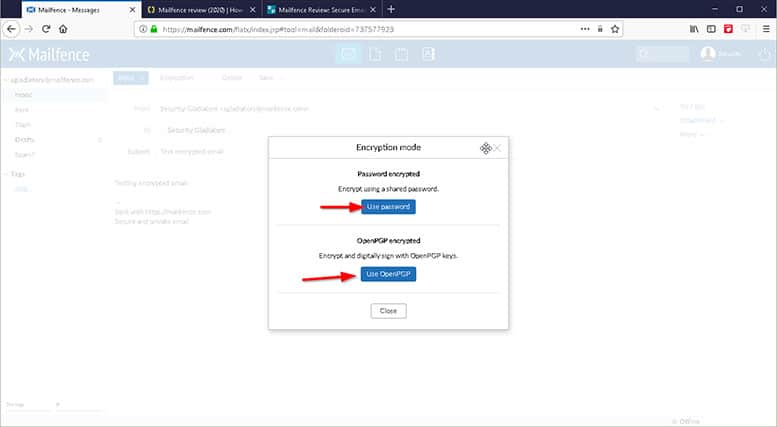
Once you do that, a Mailfence wizard should take you through the rest of the encryption process. You can either encrypt your message with a password (and then provide that to the receiver of the message) or you can use the OpenPGP encryption option, which will make use of the encryption keys that you generated earlier (or can generate now as Mailfence wizard will help you do that).
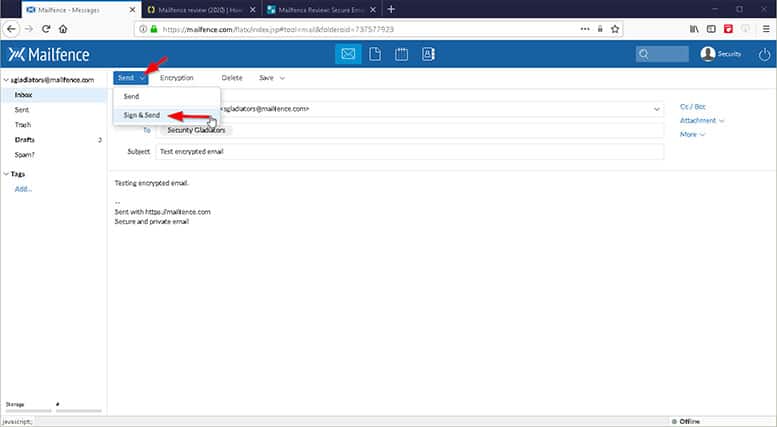
2. When you’re done with step #1, you can click the downward arrow beside the button that says Send to not only Send the message but also Sign & Send it. However, if you have encrypted your message beforehand, the Sign & Send option will automatically disable itself.
Receiving messages will usually happen the same way. For encrypted messages, you will have to provide the recipient of the message your public encryption key, which you can then decrypt with your private encryption key.
Best Privacy Practices

The first thing you should understand regarding OpenPGP communication is to never trust public keys blindly. The problem with public key servers is that anyone can upload to them.
Be sure to verify the actual public key provided via the owner. A key fingerprint can come in handy when doing so.
Following that, it’s a good idea to check the public key from the actual recipient of your encrypted message. Either contact them via phone/internet or meet in person and discuss.
On that note, you can always find the key fingerprint of someone’s public key on their website or social media profile. If the recipient has a blog where they’ve posted the key, check there.
Regularly update your keystore’s public keys. Mailfence makes things easy for you in this case by providing you with a button that says ‘Update From Public Server,’ which updates your Keystore for any public key revocations and/or expirations.

Good communication can go a long way while you’re trying to engage in encrypted messages. It is a good idea to make your public key easily identifiable and available.
More specifically, your important/regular receivers should know your public key and you should tell them to use it when they send you messages. Moreover, you can also ask them to send you their public key within the body of their encrypted message.
Such practices can prevent key-exchange attacks, which are becoming more and more common these days.
You should provide correspondents with several platforms to verify your public key. So, have your public key for viewing on your social media profile, any mailing list that you may have, public key servers and any other channel that you use.

Having your public key on a reputed public key server and updating that information is just the start. You should configure your OpenPGP key properly as well. So, generate a new private key and make it strong.
Mailfence will generate a 4096-bit RSA key for you, but some tools don’t do that and instead generate a 2048-bit RSA key. Keep an eye on that.
Moreover, you should always have an expiration date for your encryption keys. While this may cost you some effort, if a compromise arises and you lose access to your revocation certificate, an expiration date on your encryption keys can disable them.
Conclusion
Now you know virtually all there is to know about sending and receiving regular and encrypted messages using the Mailfence platform. The great thing about using Mailfence as your secure email provider is that you don’t have to download anything or install any app to get started.If you have any questions, feel free to let us know in the comments section.