The seven ways to install a VPN on Mac are listed below.
- Go to the VPN settings page.
- Add a new VPN Network.
- Select the VPN option.
- Select the VPN protocol that you prefer.
- Log in to your VPN service of choice.
- Click on the authentication settings.
- Connect and authenticate your account.
Table of Contents
1. Go to the VPN Settings Page
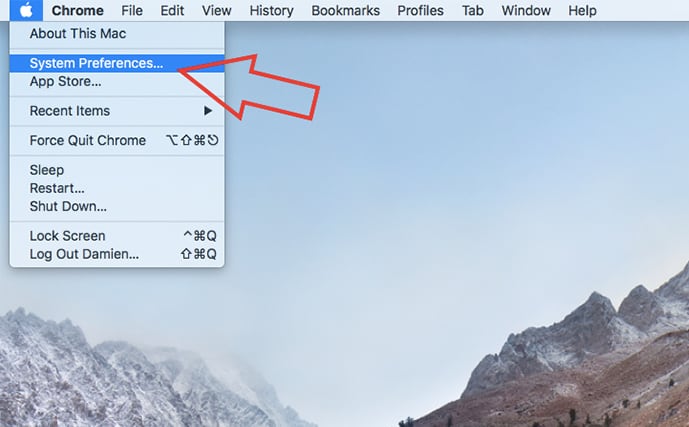
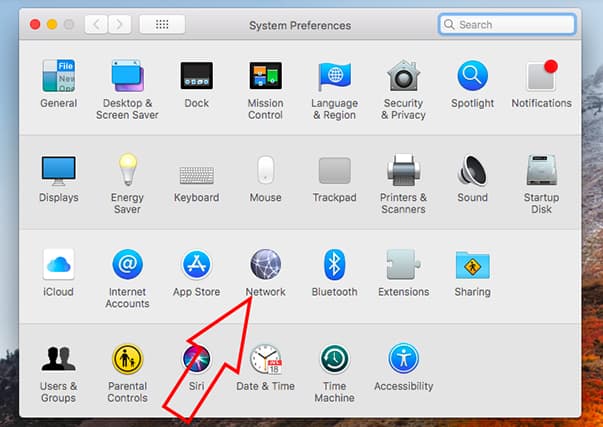
Locate the “System Preferences” panel by clicking the Apple logo on the upper-left corner of the screen. A drop-down menu reveals the “System Preferences” option; click to open the window containing further options. Pan through the icons and open the one indicated as “Network.” The user interface for Mac computers might differ from other operating system versions but generally follows the same steps in navigating the VPN settings page. This is where users enter the VPN’s configuration settings.
2. Add a new VPN Network
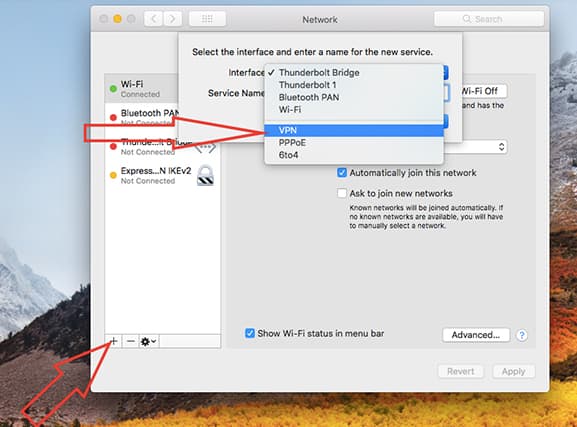
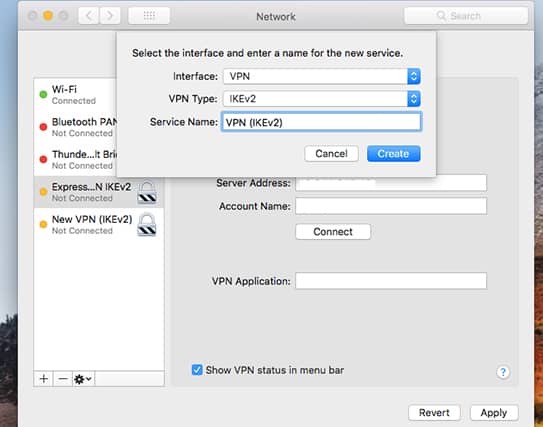
As the “Network” icon is opened, pay attention to the lower-right part of the window. This shows where current operating networks are, as indicated on the list on the left panel. A small “+” sign can be seen to open a pop-up box. Information such as the type of VPN and the service name would appear. On the interface portion, click on the drop-down menu and select the options that one prefers. The interface, “VPN Type” and “Service Name” are the options that need to be chosen. This information is saved on the Network menu, which is significant for configuring the VPN’s last few steps. This step helps establish the VPN connection.
3. Select the VPN option
On the interface, click on the drop-down menu and select “VPN.” Choosing the VPN option indicates that the network is set up for VPN use, which identifies how the manually installed network or service would operate. The third selection requires entering the name of the VPN. One can make a name for the VPN to quickly identify the service when configured and authenticated. The Mac interface automatically sets the name according to the service and type of VPN but can be optionally edited out. It is recommended to name the VPN according to the interface and the type used.
4. Select the VPN Protocol that You Prefer
The second drop-down menu asks for one’s preferred VPN protocol, which is a set of systems operating commands that make up the VPN. Protocols contain instructions on how one’s data is handled and carried through the VPN server. This generates a communication line between the user’s computer and the VPN’s server network. The set of protocols dictates how one’s computer application and software will bypass the VPN server and identify the security for use. A variety of VPN protocols would entail a different level of security, encryption and speed; this is vital in determining the overall VPN performance in the Mac computer. A much more advanced protocol provides up-to-date security protection for users’ information and stored data. There are three commonly used extensions and protocols: L2TP, IPSec and IKEv2. L2TP enables VPN access through the Point-to-Point Tunnel Protocol (PPTP) addressed by internet service providers. IPSec is another set of instructions that encrypts information. IKEv2 is a VPN protocol that provides two-way encryption between networks and servers. Then click on “Create”.
5. Log in to Your VPN Service of Choice

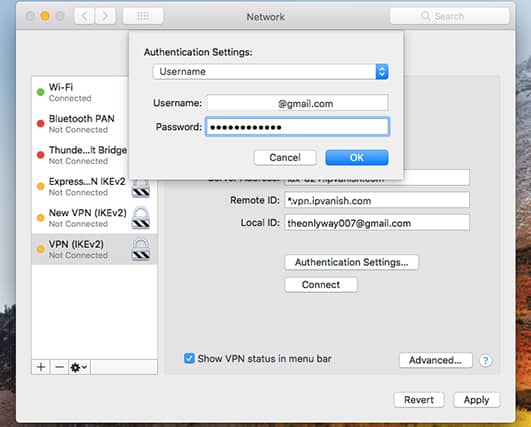
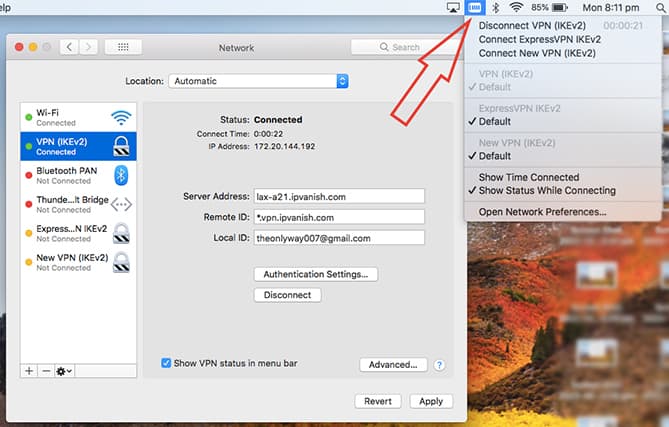
Once the VPN service connection has been created, users should be able to log in. A pop-up window appears after clicking on the “create” option from the previous step. Then, the VPN appears on the left panel of the current “Network” window. The status would indicate “Not connected” as specific information needs to be filled in. Users should input the “Server Address,” “Remote ID,” “Local ID” and authentication. Server Address pertains to a local network VPN server to which the user connects, this can be obtained from your VPN provider. Remote ID can also be entered by obtaining the information from your VPN service provider. The Local ID is generally your username for your VPN.
6. Click on the Authentication Settings

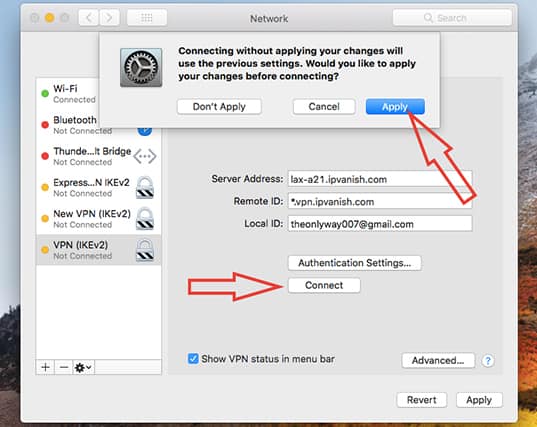
After the local ID box, users should supply information to authenticate the VPN account. A pop-up box would appear to require specific authentication setting information. On the first menu, select “Username” from the drop-down menu. The username and password should be supplied from the given VPN account sent by the provider. Click “OK” to confirm if the information entered is completed. Tick the box asking to show the VPN status in the menu bar, then click “Apply.” This option allows the VPN to be featured in the toolbar at the upper-right corner of the screen. Users can easily click on the icon to adjust the settings.
7. Connect and Authenticate Your Account
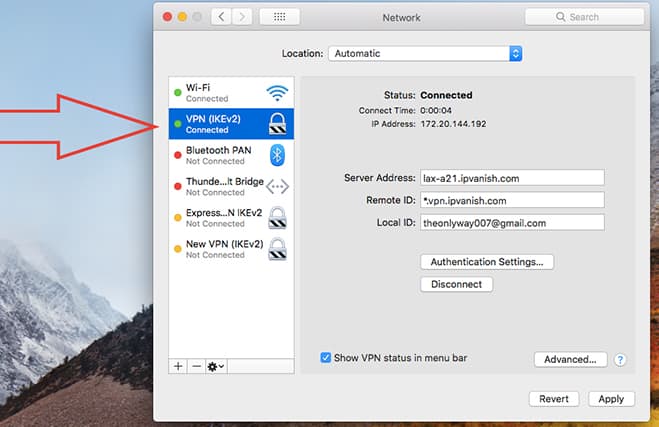
The Mac should be able to connect to the network once linked to the VPN account. To fully connect to the VPN, click on the icon of the VPN provider found on either the toolbar or the launchpad. The specific steps may differ depending on the interface, but users should generally find the option to connect to a VPN server from the service’s network. Pick any server worldwide. Once the connection is activated, installation is successfully done and can now serve the VPN’s purpose and features.
Is There Another Way to Install a VPN on Mac?
Yes, VPNs can either be manually installed (as shown in the instructions above) or through a VPN application. Another way of installing a VPN on a Mac is through the dedicated app by the VPN provider. The VPN app can be downloaded from the VPN service’s website either on a paid subscription basis or for free. A premium VPN service would entail more features than those offered for free. An installer for the VPN software is downloaded, and then the app can be installed. Make sure the VPN provider offers Mac-compatible software to be successfully installed. A VPN icon appears on the Mac toolbar or in the launchpad where one can activate the VPN connection. A “connect” button is commonly indicated for linking the user’s connection with a VPN server. Most VPN services offer server locations in various countries worldwide. To activate or deactivate the VPN service, click on the toggle button.
What are the Best VPNs for Mac?
The best VPN for Mac should provide advanced encryption, strong security protocols, a no-logs policy and safety features such as a kill switch. ExpressVPN and Surfshark are considered the best VPNs for Mac for meeting all of those qualities.

ExpressVPN promises a vast VPN network catering to maximum speeds, offers advanced protocols and other features, and ensures that users’ data is not kept in log files. ExpressVPN easily bypasses geo-restricted websites and content with up-to-date and secure servers. The best VPN for Mac computers should be able to conceal the person’s information and identity securely.
Surfshark ranks popular for Mac-compatible VPNs for the product’s strong encryption and fast VPN protocols. Surfshark also ensures no downtime and features a kill switch that prevents leaks by activating during connection drops. Surfshark provides 24/7 customer support when issues and concerns ensue at the most inconvenient times of the day or week.
Does Mac have a Built-in VPN?
No, Mac computers do not have built-in VPNs. The Apple brand may have created a secure ecosystem for the users, but the company itself does not offer a VPN currently. Users can manually generate VPN networks through the system settings to connect to VPN servers online. Users should download a Mac-compatible version of the VPN software directly from the provider’s website. One should ensure the compatibility and security of the commercial VPN to protect data and information from being compromised.
How to Choose the Best VPN for Mac
VPN subscription fees aren’t cheap, so some knowledge and research is needed to find the right VPN worthy of the consumer’s hard-earned money. Some essential tips on choosing the best VPN for Mac are given below.
- VPN services can come both as free services or paid subscriptions. Free software often has limited features that can only be used when one invests in the subscription. Paid services are usually recommended for better security since the business model is based on monthly subscriptions rather than selling data to advertisers and other third parties.
- Read reliable reviews from confirmed VPN users to ensure the credibility of their experiences with the VPN. One must be critical as some online reviews are biased or fabricated by brands.
- The coverage of the VPN servers is vital: One should ensure that servers are available where the VPN is intended for use. This is one of the most critical factors for choosing the best VPN for Mac computers.
- Choose VPN providers that have established a name in the industry to ensure that the provider has credible platforms. The amount of users determines customer satisfaction, serving as a validation for the quality and authenticity.
- The Apple Mac ecosystem can be restrictive with external software. Before purchasing the VPN software, make sure the app works and is compatible with Mac computers.
How to Use a VPN
For beginners, using a VPN can be complicated without any background knowledge of the software. VPN providers design the user interface as user-friendly as possible for users to navigate through the software easily. A short guide on how to use a VPN is given below.
- Users must first choose a VPN provider based on one’s needs. Going through the features and limitations of the VPN is essential to meet expectations. If money is a constraint, one could opt for reliable free VPNs.
- After choosing a VPN provider, click on the download button to save the installation package locally. Ensure the VPN application is compatible with the Mac operating system (macOS).
- Open and drag the VPN installer through the application’s folder to install the VPN. The icon appears on the app drawer or the toolbar once the application has been successfully installed.
- Click on the VPN tool icon to remove the software pop-up with the VPN’s settings and activation options. Most VPN interfaces provide easier access to activating or deactivating with just a click of a button.
- Log in to the VPN account and click the option to connect to a server from the list. Then, begin browsing the internet securely and privately through the new VPN connection.
